1. Installation
The following chapter describes the installation of the voraus.operator for KUKA industrial robots.
1.1. Setting up the KUKA robot for usage with the voraus.core
Warning
When using, operating and interacting with a KUKA robot, always obey to the instructions of the original KUKA manual.
The following sections assume that the KUKA robot is set up and can be moved with the KUKA smartPAD and the default KUKA controller software. If the robot is not set up yet, please follow the official KUKA documentation. Also, it is assumed that the user knows the basic steps on how to operate the robot with the KUKA smartPAD like switching the operating mode and starting/stopping KUKA programs.
In order to connect the voraus.core to a KUKA system, the KUKA controller has to be prepared first. For this, follow the chapters WorkVisual installation and Setting up the RSI interface.
1.1.1. WorkVisual installation
In order to work with files on the KUKA robot controller, the KUKA software WorkVisual is recommended. A quick installation guide can be found in this section.
Get the software installation file, e.g. from https://my.kuka.com (Version 6.0 or higher required).
Extract and install the software using the default settings.
Either directly connect an Ethernet cable from the Ethernet port of the robot controller to your computer or use an Ethernet switch in between the two components.
Configure the connected Ethernet port of your computer to be in the same network as the KLI interface of the KUKA robot (see exemplary IP address in Fig. 1).
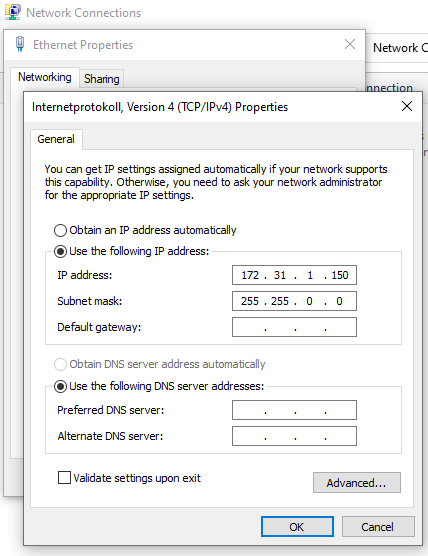
Fig. 1 IP configuration of the local machine
The IP address of the KLI interface of the robot can be configured on the robot’s smartPAD under: Main Menu/Start-up/Network configuration. The default address is 172.31.1.147 but it can be changed to any other IPv4 address (see: Fig. 2).
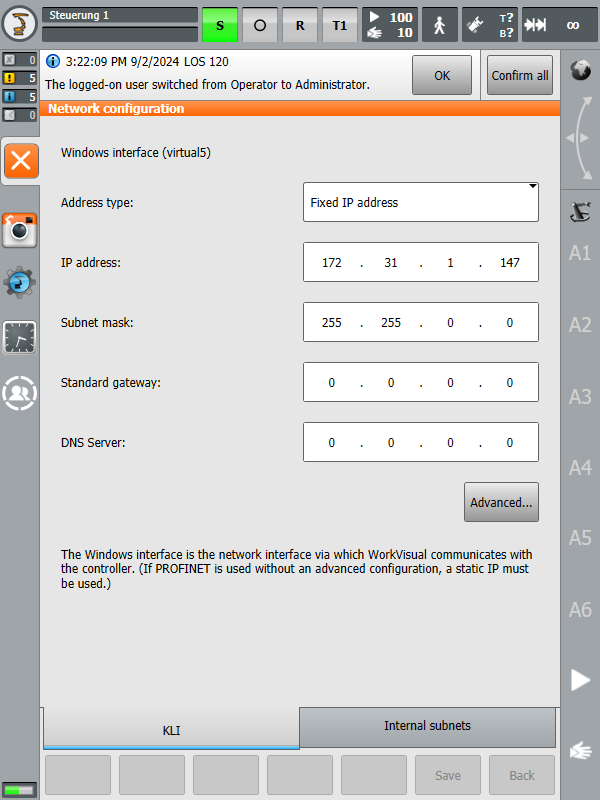
Fig. 2 IP of the robot
Start WorkVisual on your computer.
After the software starts, click on Open Project from the file menu (Fig. 3/➊).
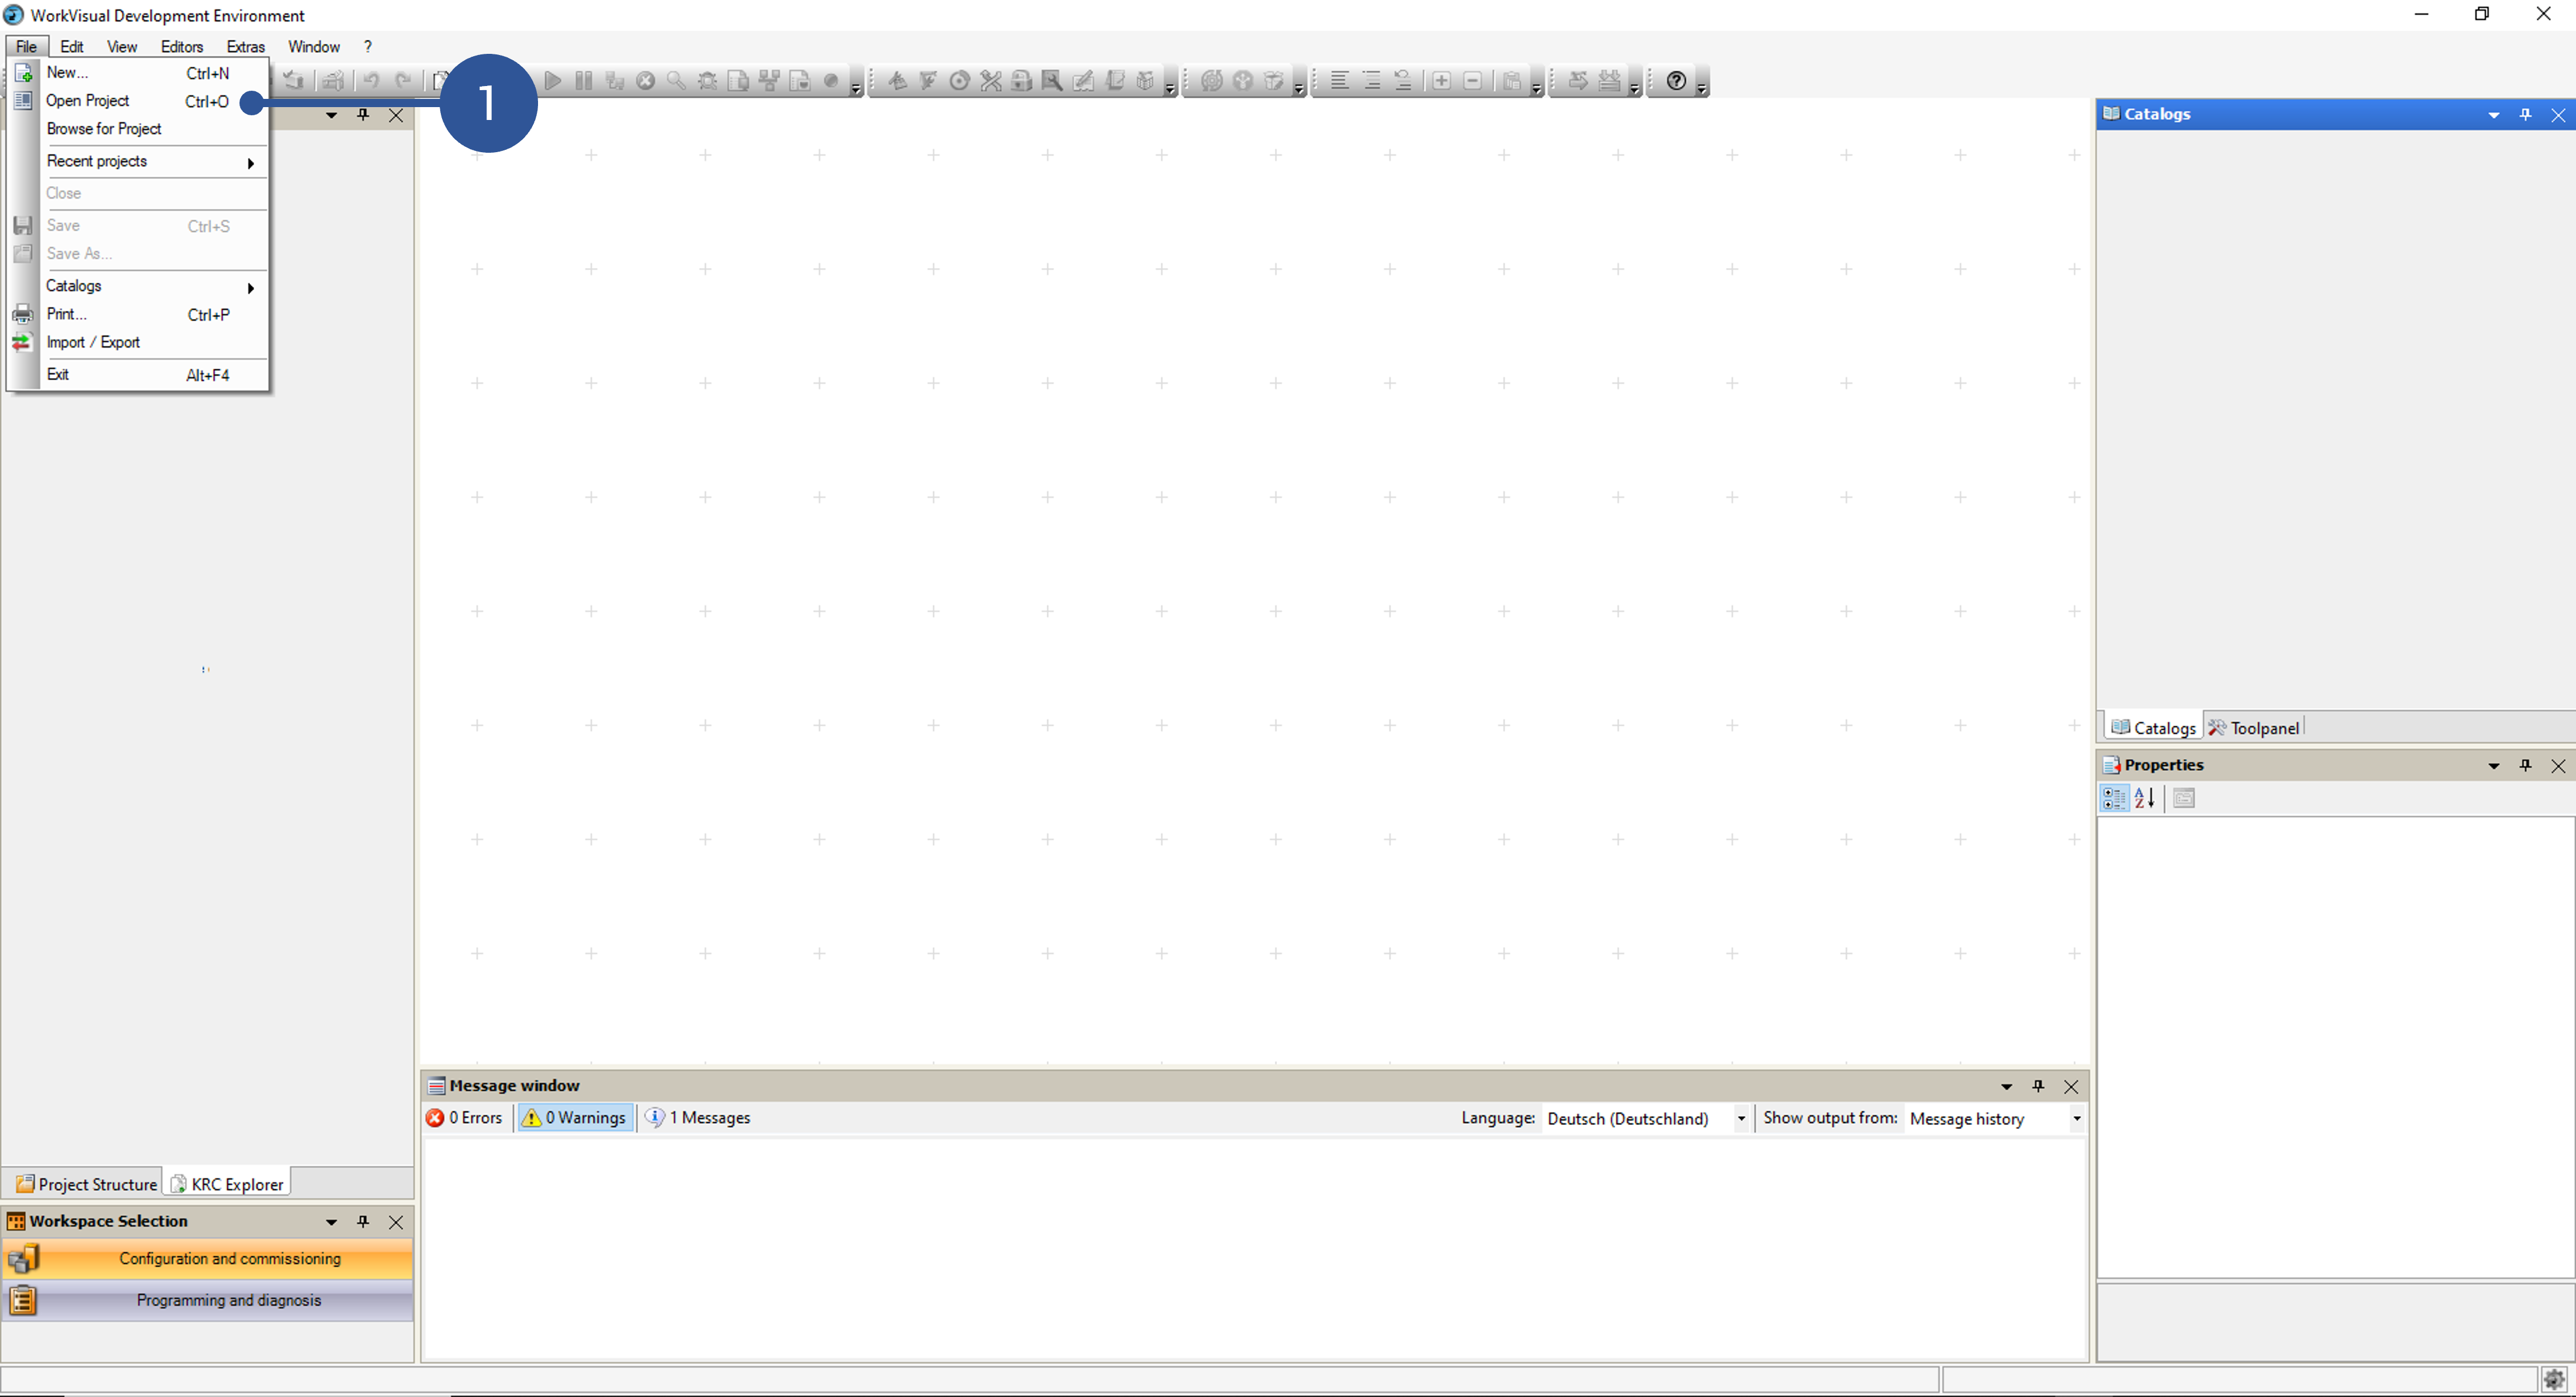
Fig. 3 WorkVisual first steps (1)
On the new window, click on Search (Fig. 4/➊). The robot should be found automatically. If not, search for the robot IP manually as illustrated in Fig. 4/➋ and ➌.
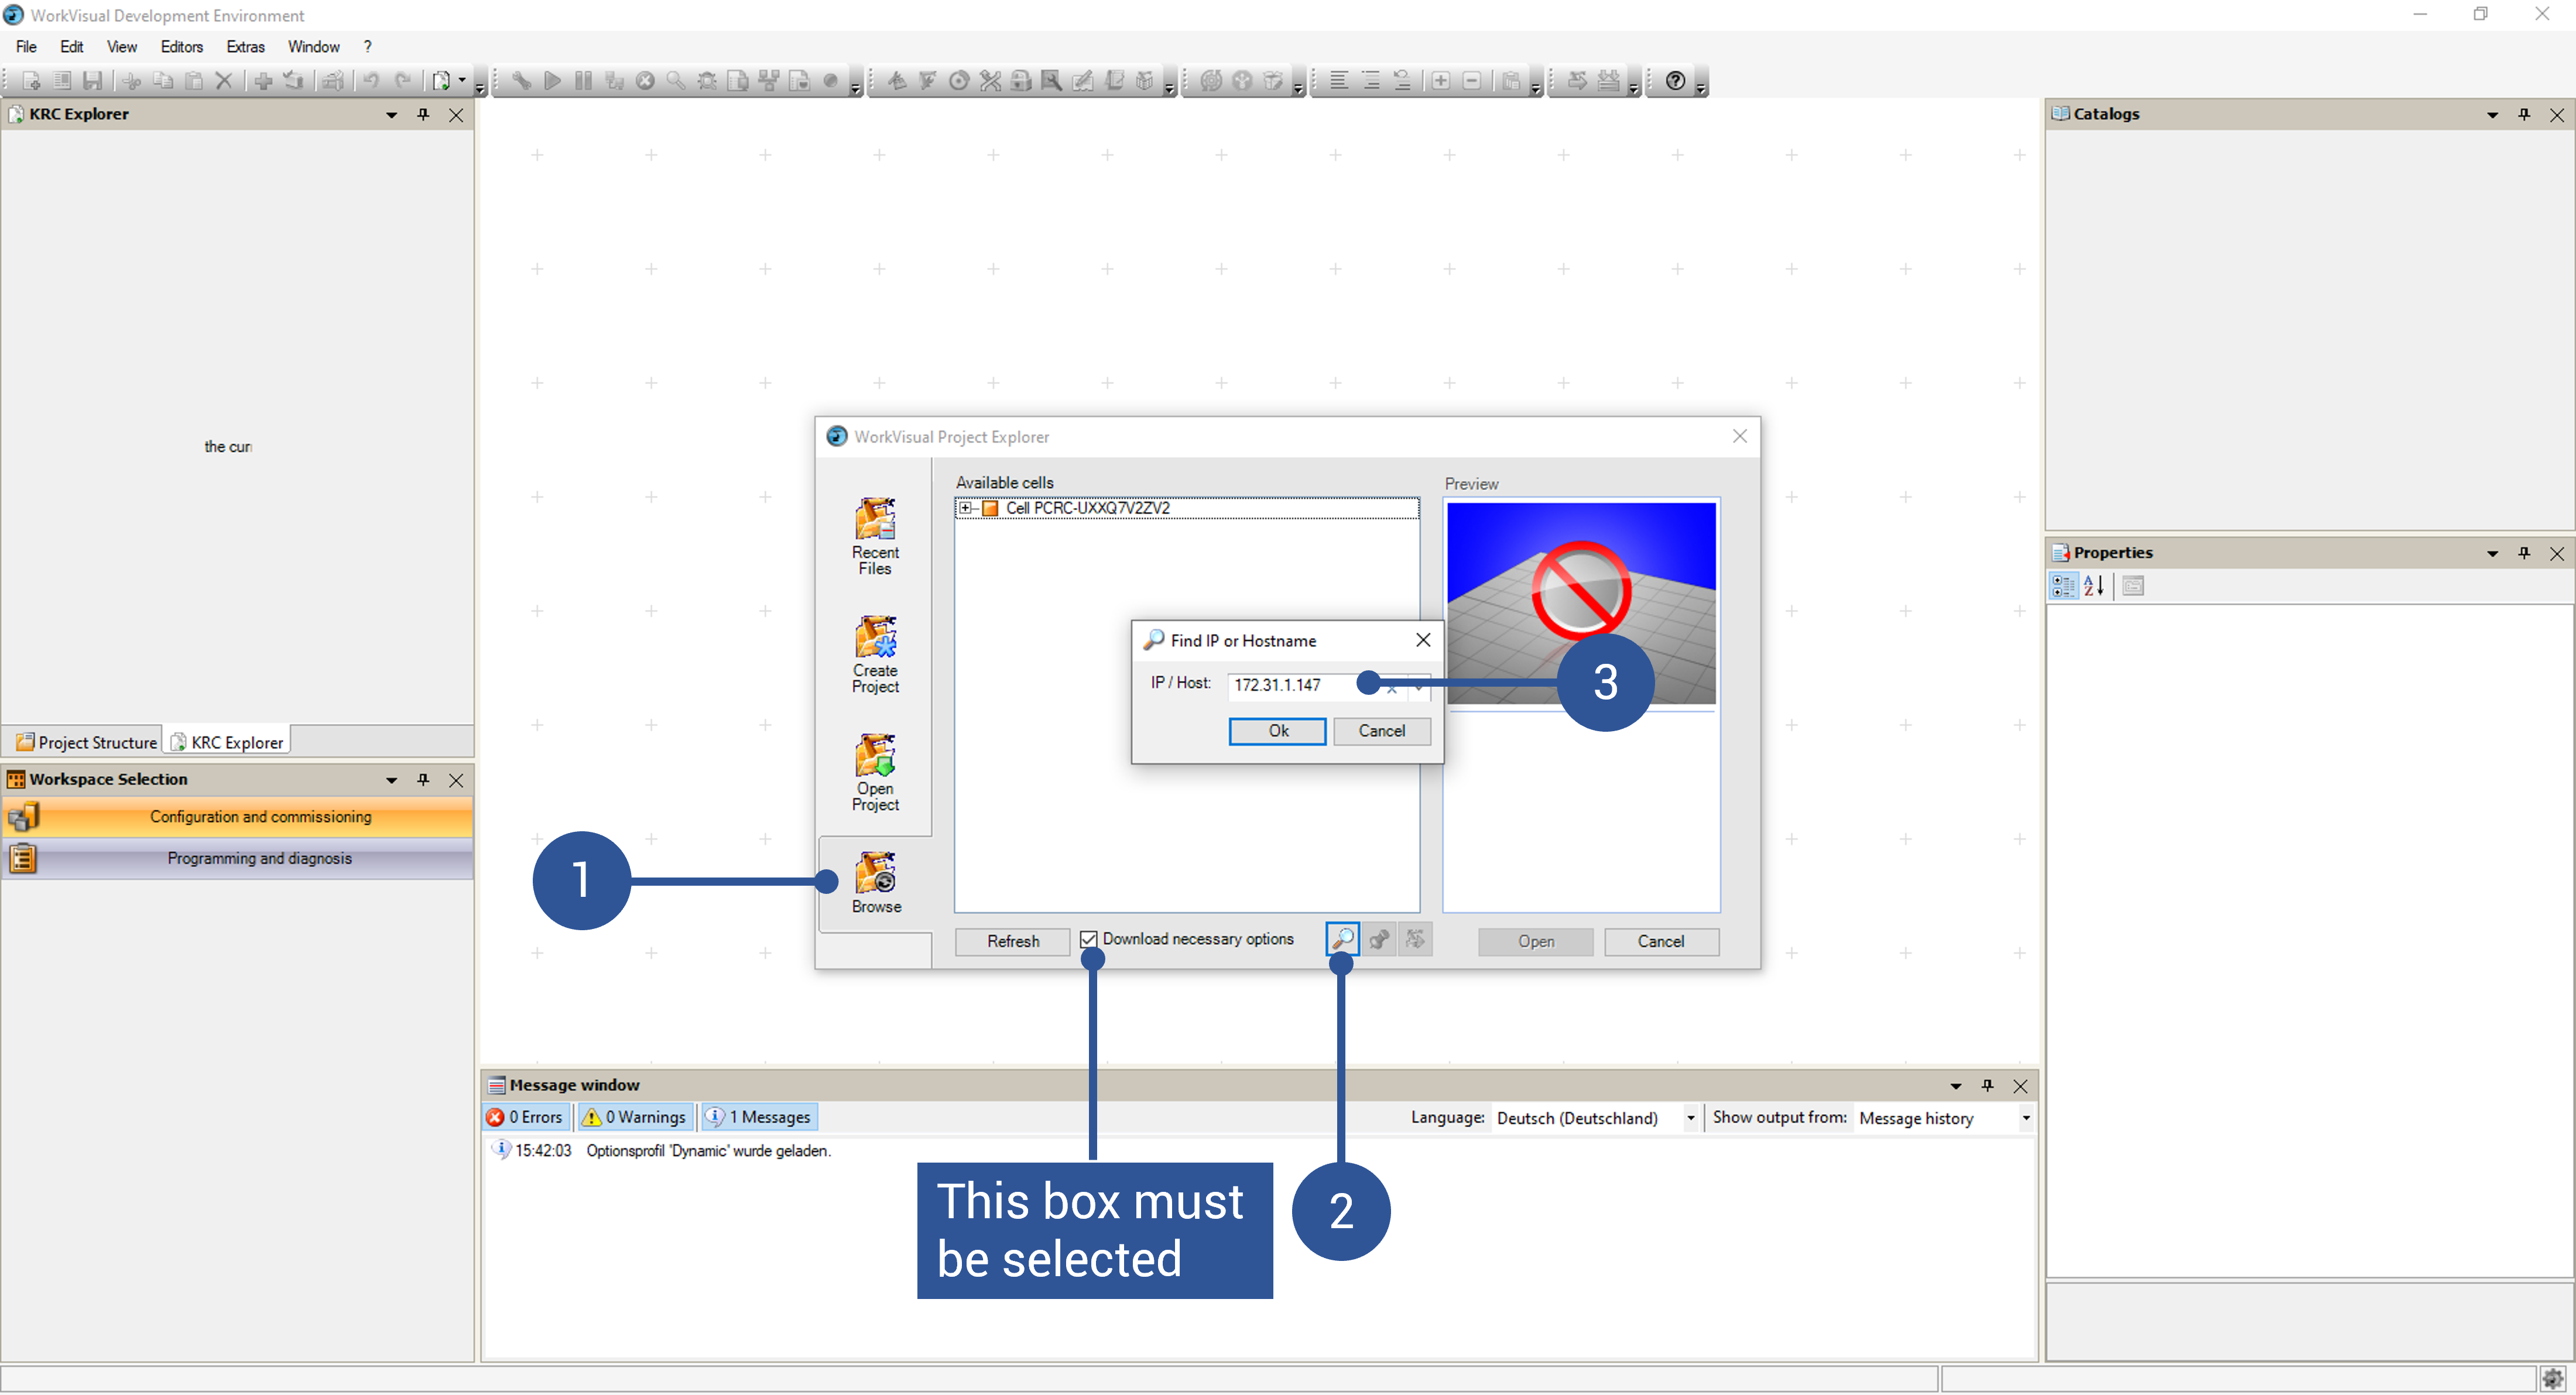
Fig. 4 WorkVisual first steps (2)
The files on the robot control can now be displayed by clicking on Programming and diagnosis (Fig. 5/➊). If necessary, the robot control can be selected using the corresponding checkbox (Fig. 5/➋). The main directory is shown in Fig. 5/➌. It might be necessary to click Load files and folders from controller in the toolbar at the top to synchronize your WorkVisual workspace with the one of your controller (Fig. 5/➍).
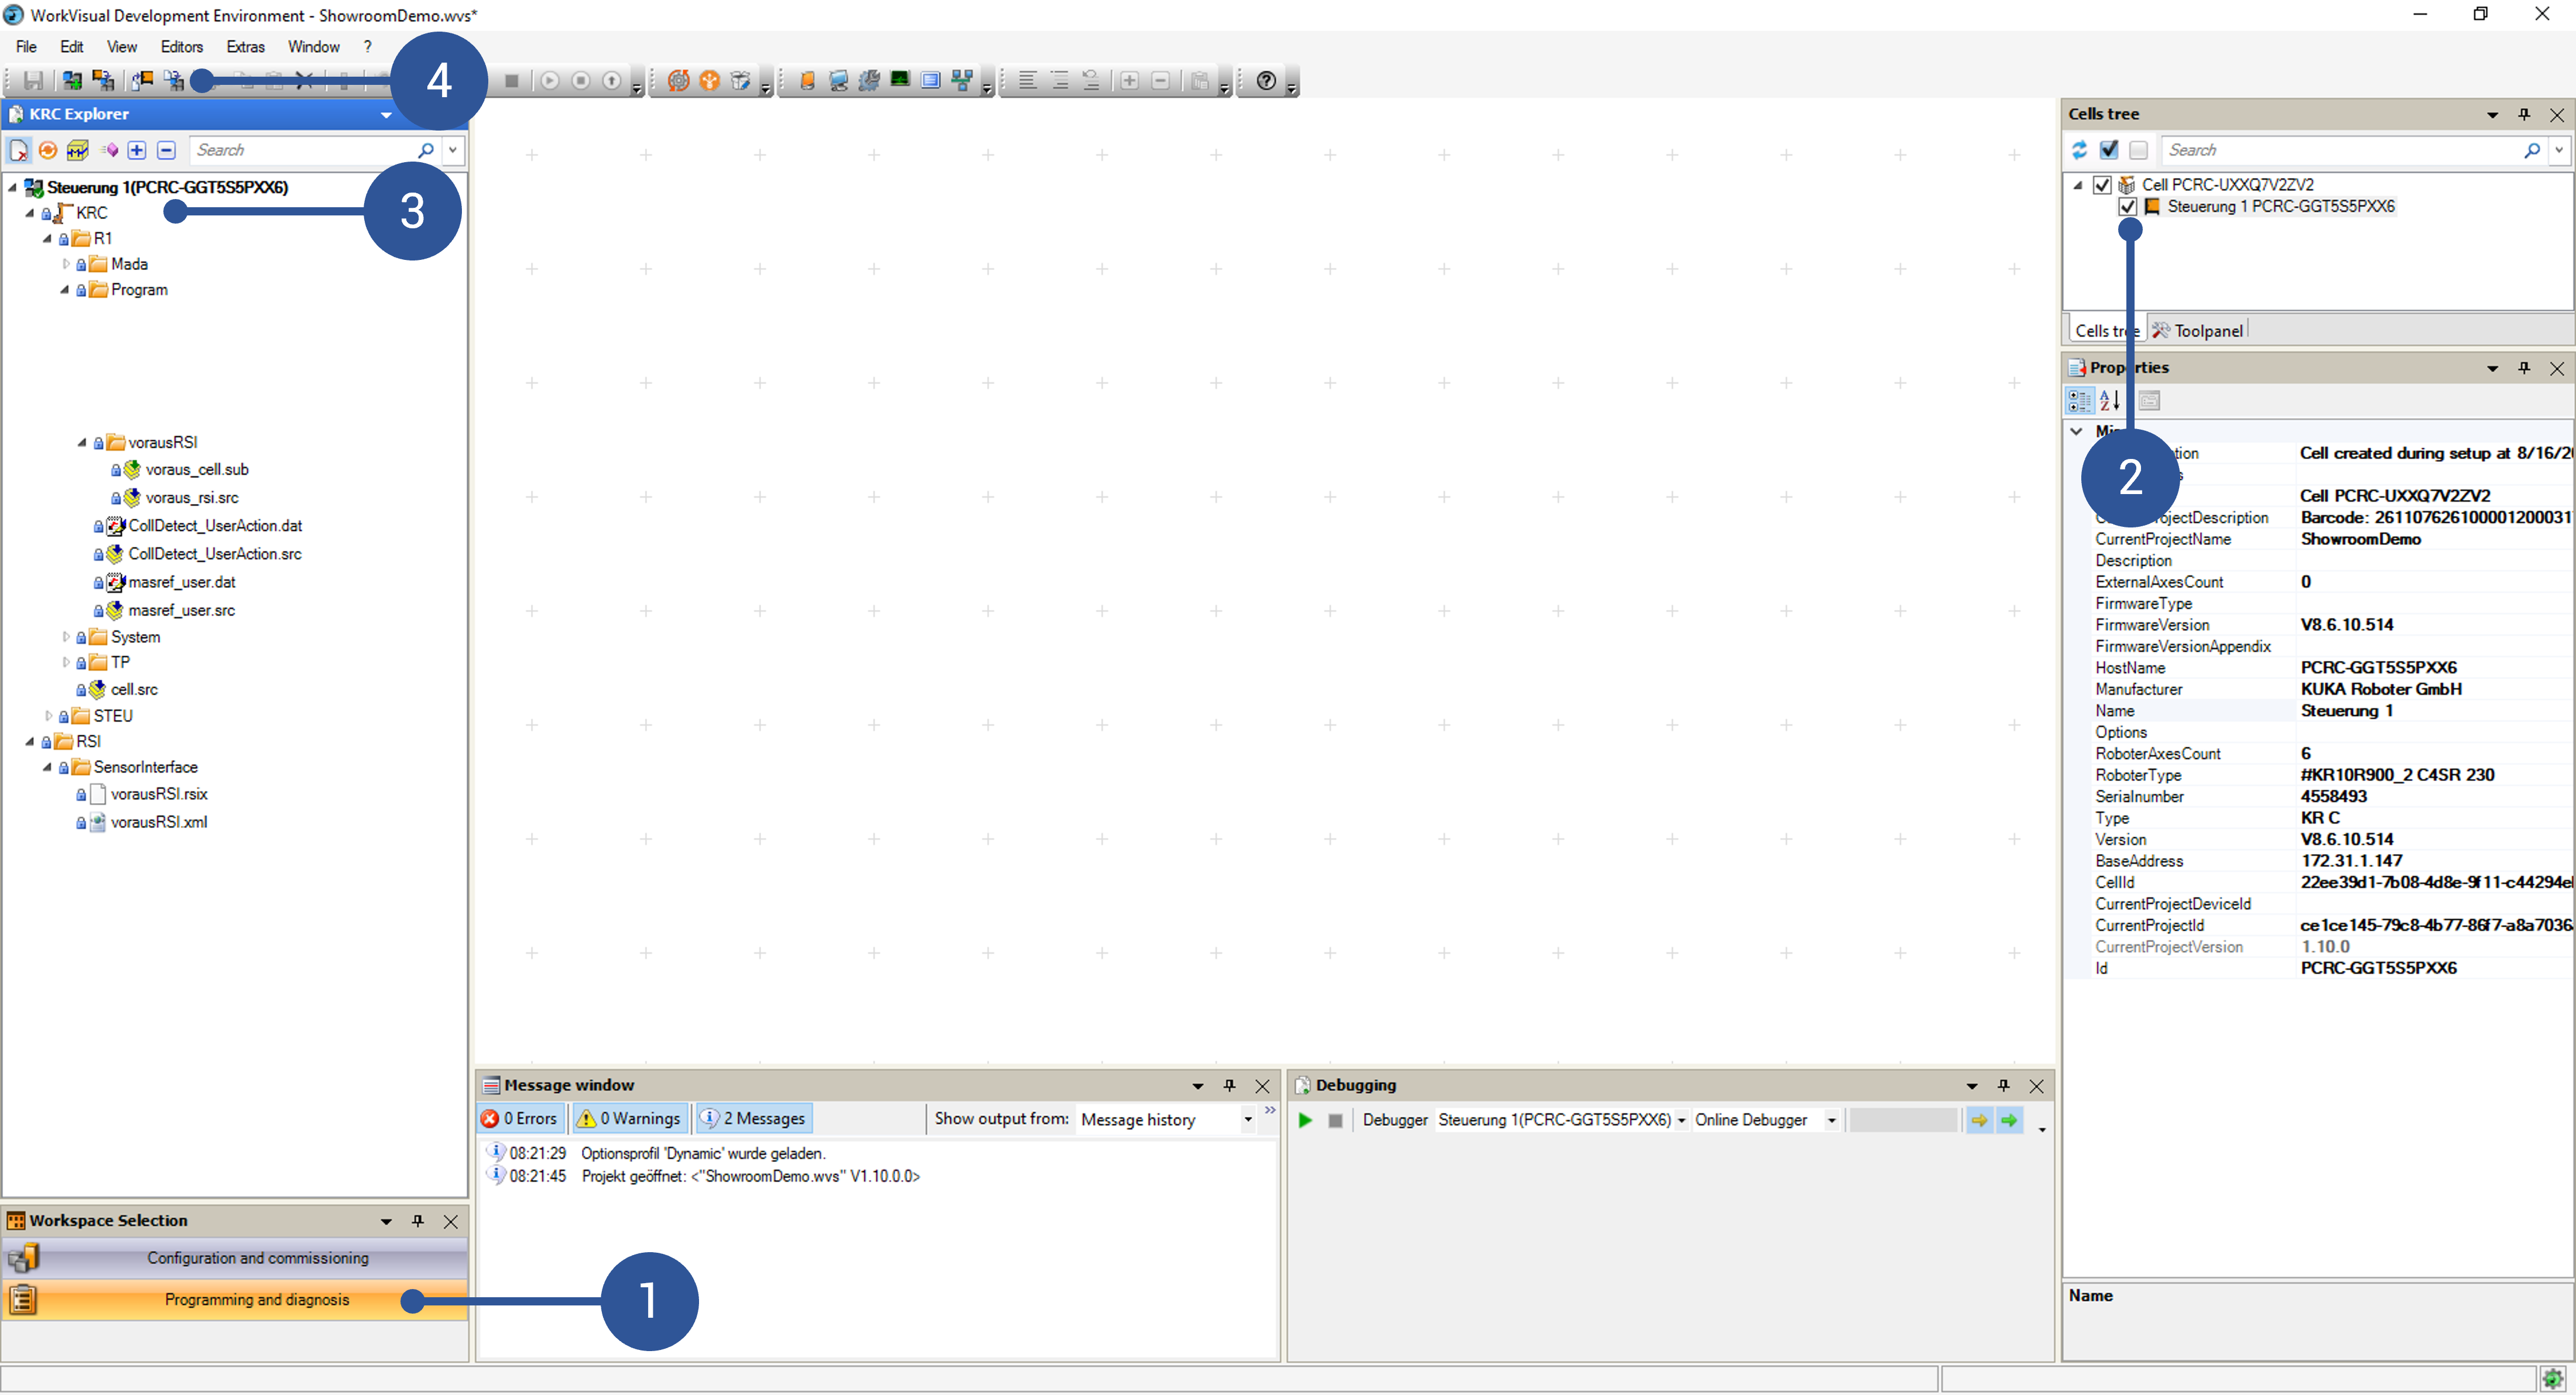
Fig. 5 WorkVisual first steps (3)
Note
If the buttons are greyed out, you might need to click on Establish controller state (Fig. 6/➊) first.
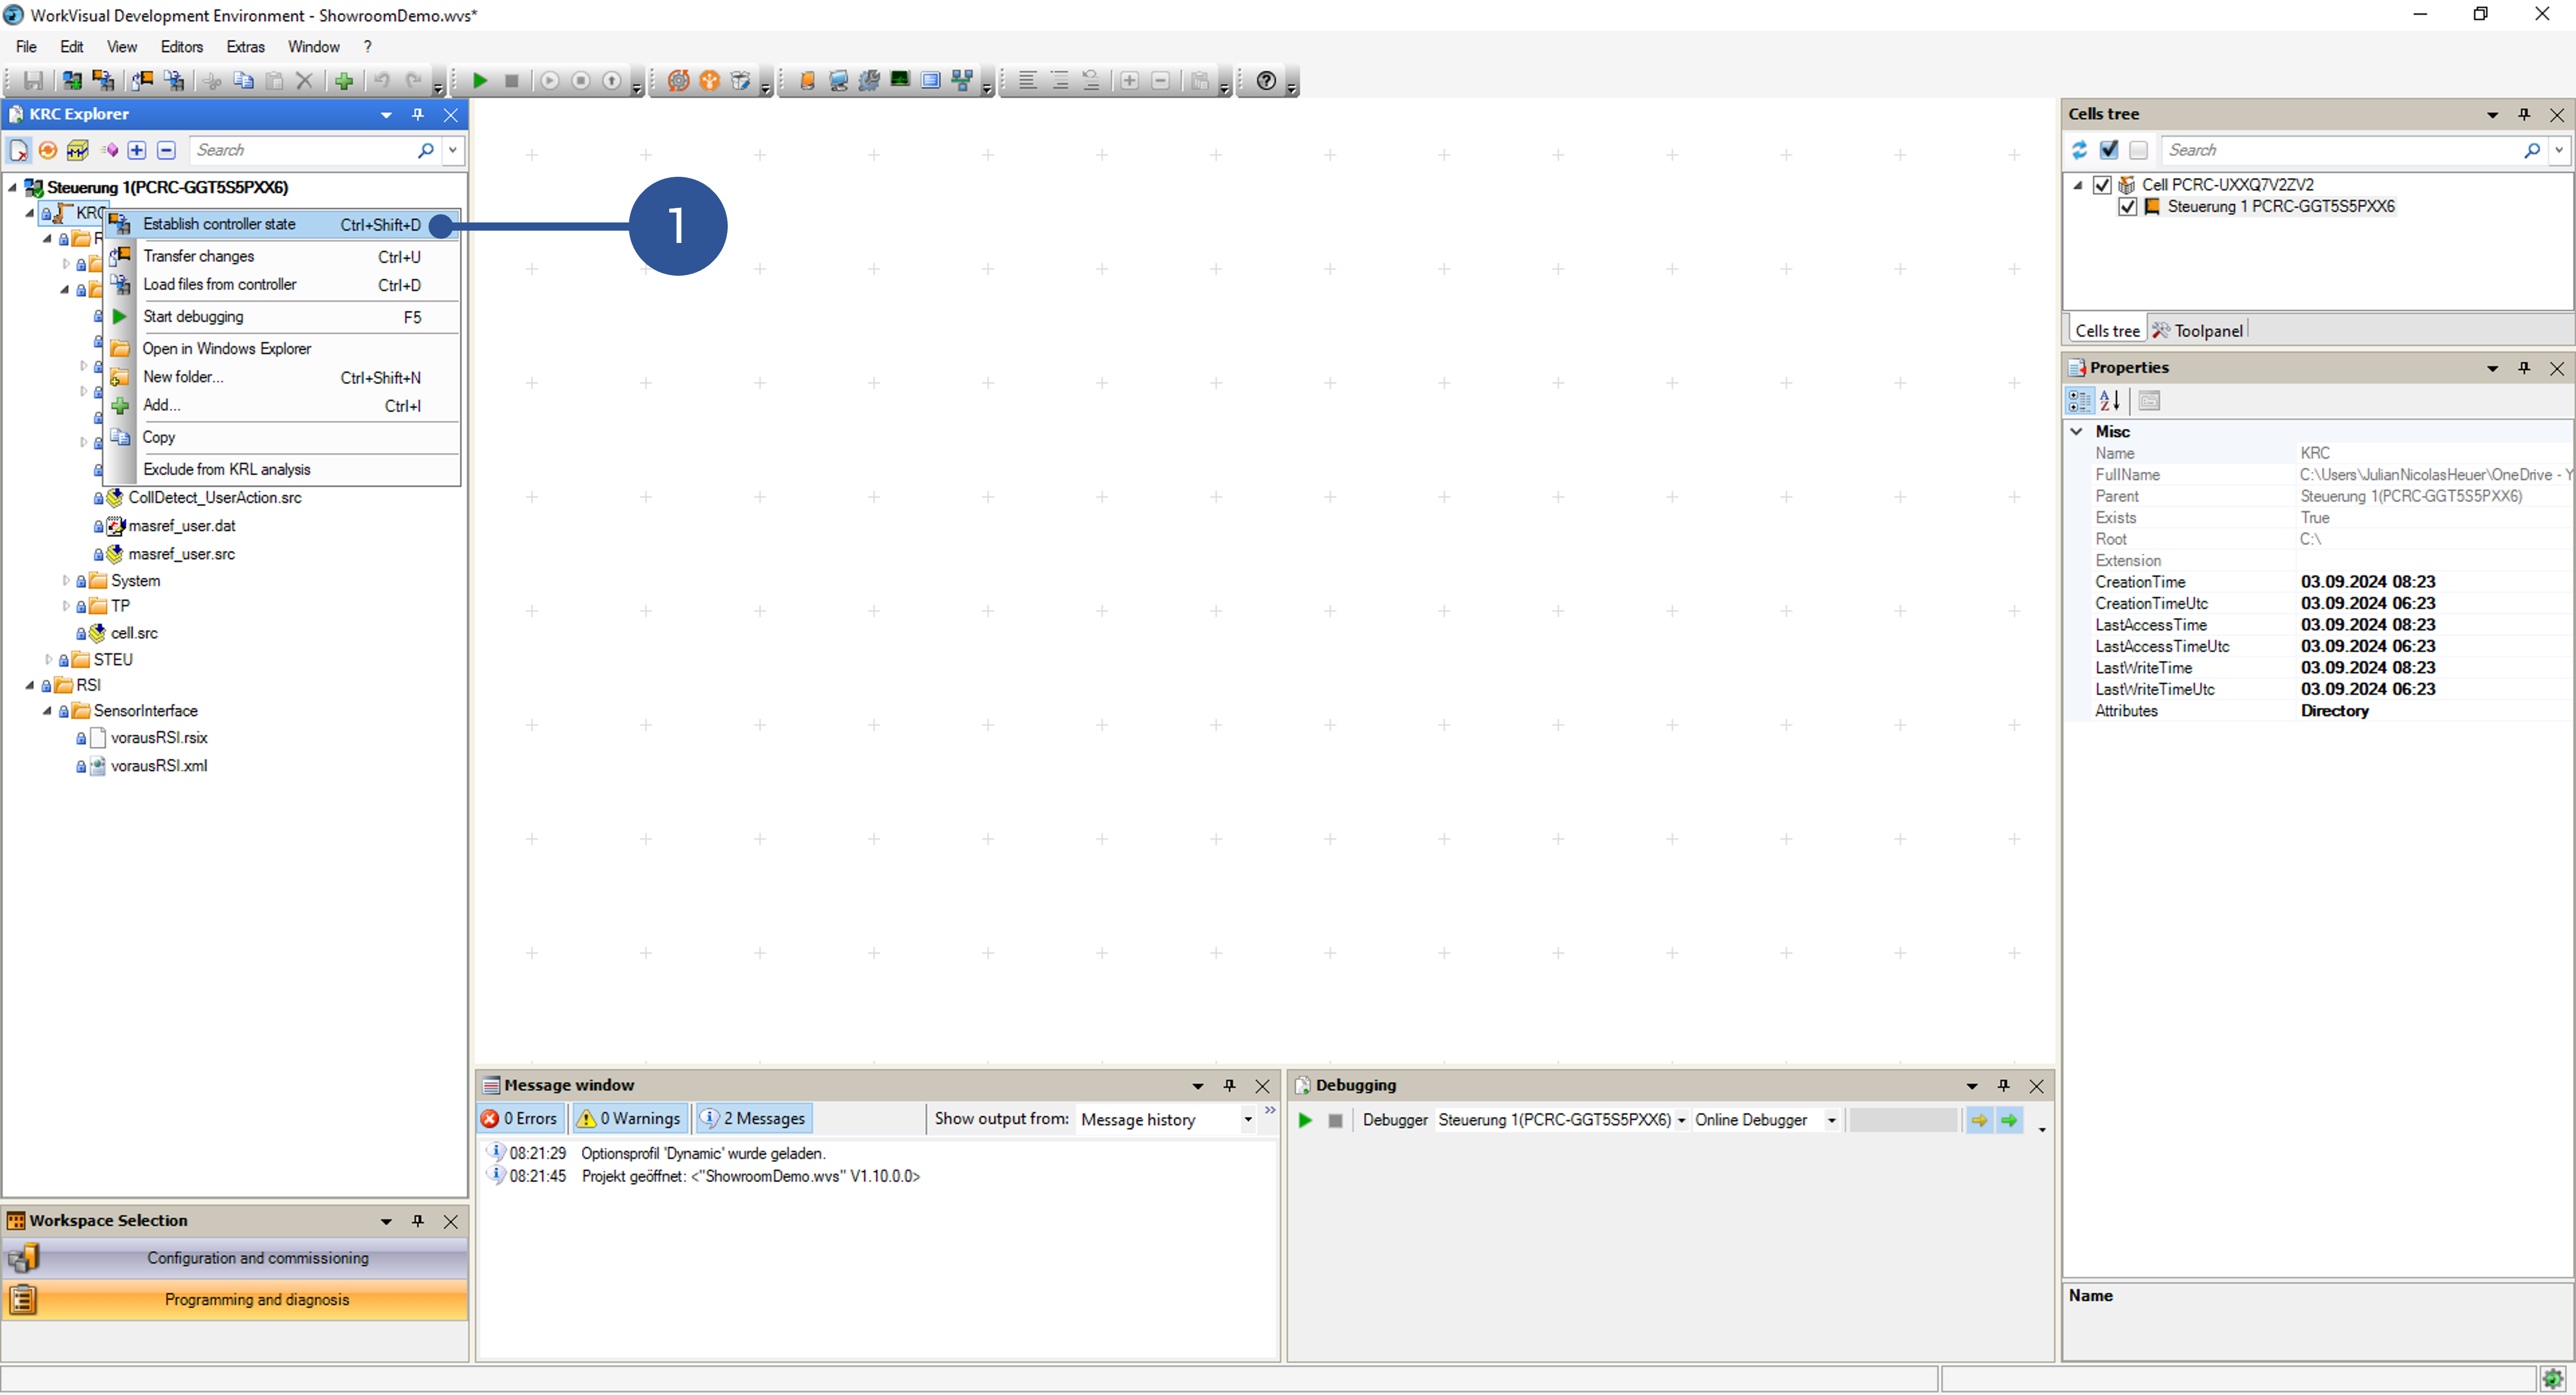
Fig. 6 WorkVisual first steps (4)
1.1.2. Setting up the RSI interface
Before the voraus.operator can be used for controlling the KUKA robot, some additional network configurations have to be done, and certain files have to be uploaded to the KUKA control.
Required KUKA option packages:
KUKA.RobotSensorInterface 4.1 or newer
You can check the installed KUKA option packages via WorkVisual by switching to the Configuration and commissioning tab in the bottom left corner (Fig. 7/➊). Afterwards open the file explorer and then the Options folder of your control (Fig. 7/➋).
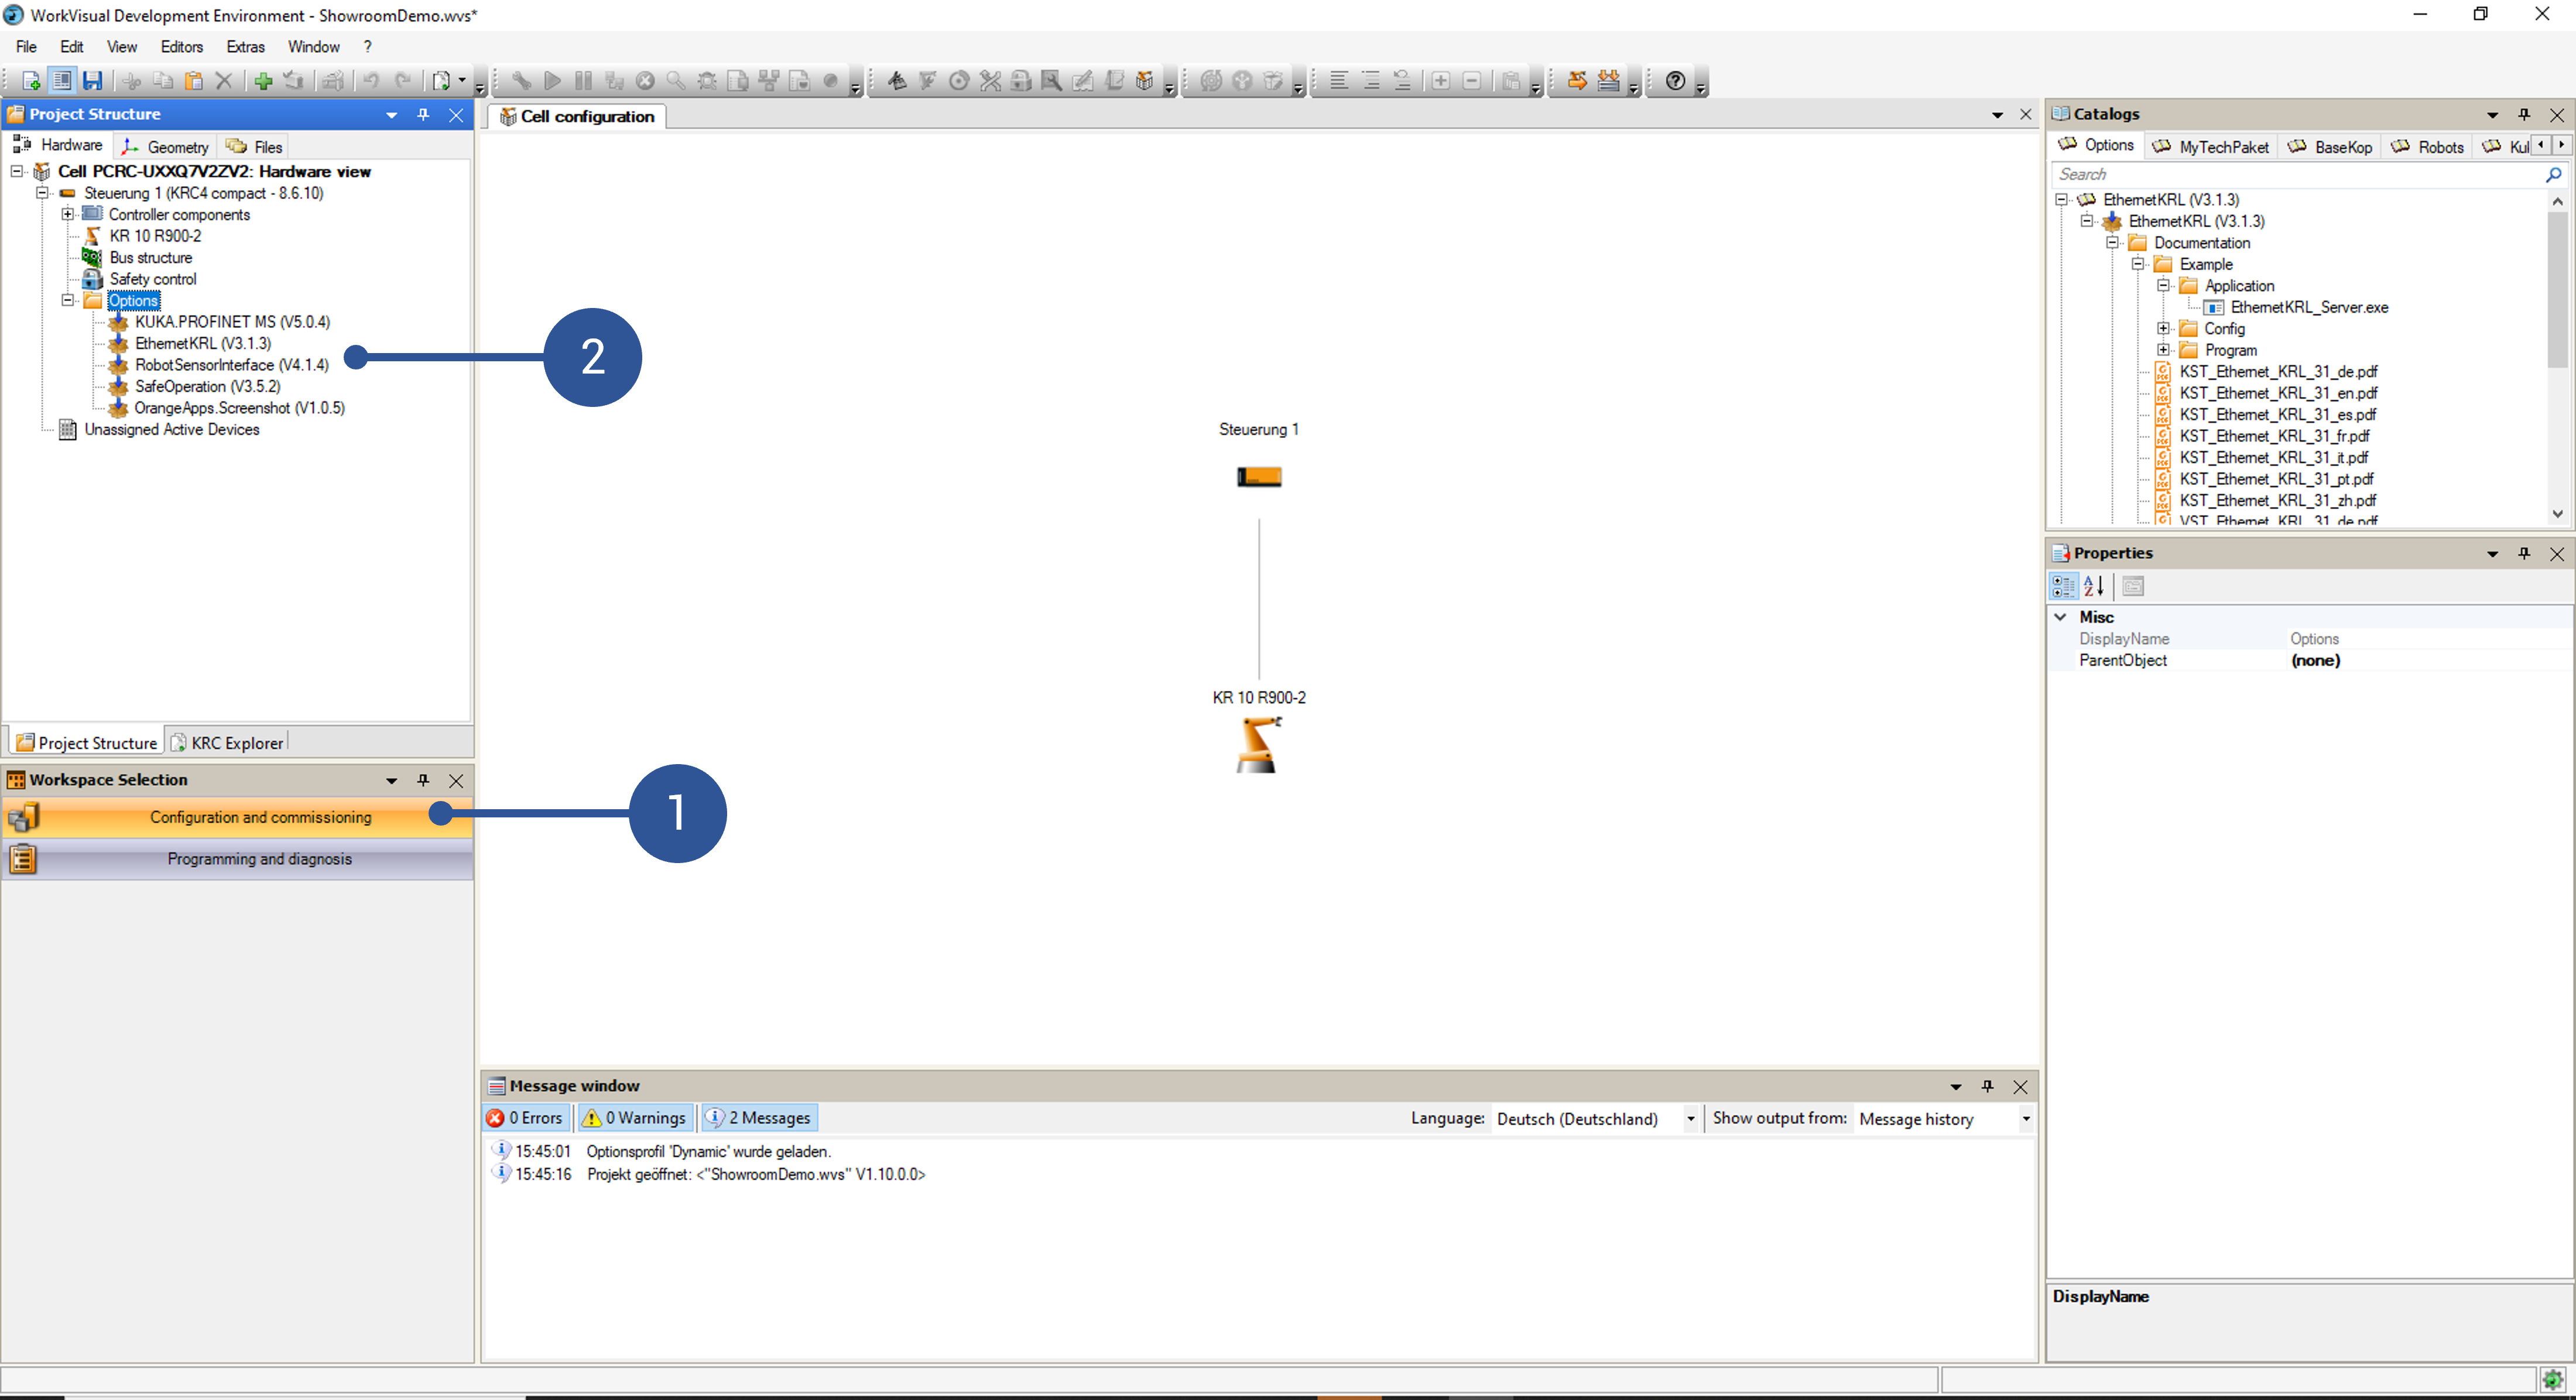
Fig. 7 KUKA option packages
Required voraus files:
vorausRSI.rsix
vorausRSI.xml
voraus_rsi.src
voraus_cell.sub
Follow the next steps to set up the RSI interface between the robot and the voraus.core:
Using the robot’s smartPAD, create a new virtual network interface in the robot’s advanced network settings (e.g. virtual6, see Fig. 8). This interface requires a different IP address than the KLI interface shown in Fig. 2. but uses the same physical network port of the KRC. If a second virtual network had already been created (e.g. to set up voraus.app //codelink), it can be used for the voraus.operator as well. In the interface settings the receiving task must be set to UDP. The virtual network interface must have the same network range as the IP address configured in configuration of the runtime (referred to as <IP_of_the_voraus.ipc>).
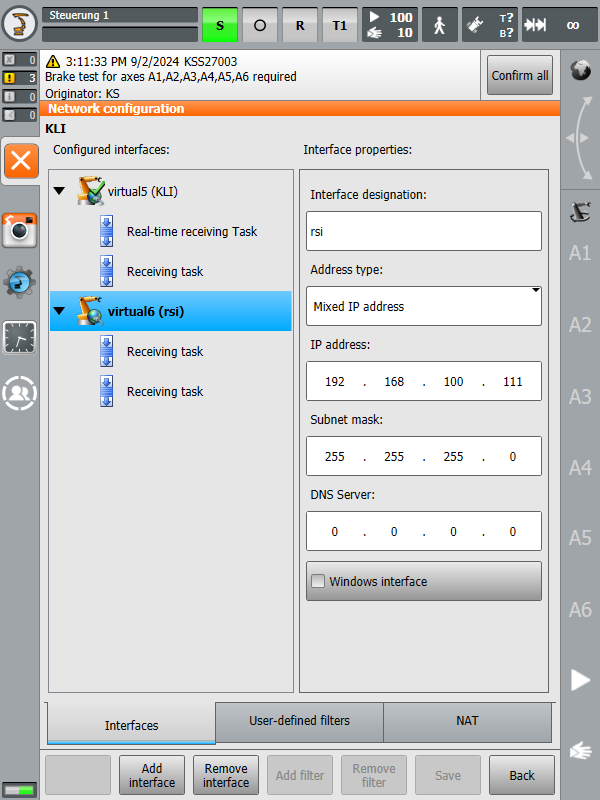
Fig. 8 RSI IP address on KUKA control
Import the RSI context file vorausRSI.rsix via WorkVisual. For that, switch to the Programming and diagnosis tab in the bottom left corner (Fig. 9/➊). From there, you can create new folders by right-clicking on an existing folder and selecting the New folder option (Fig. 9/➋) and add files directly via drag & drop. Alternatively, you can open the workspace in the default Windows Explorer by right-clicking on a folder and selecting Open in Windows Explorer (Fig. 9/➌).
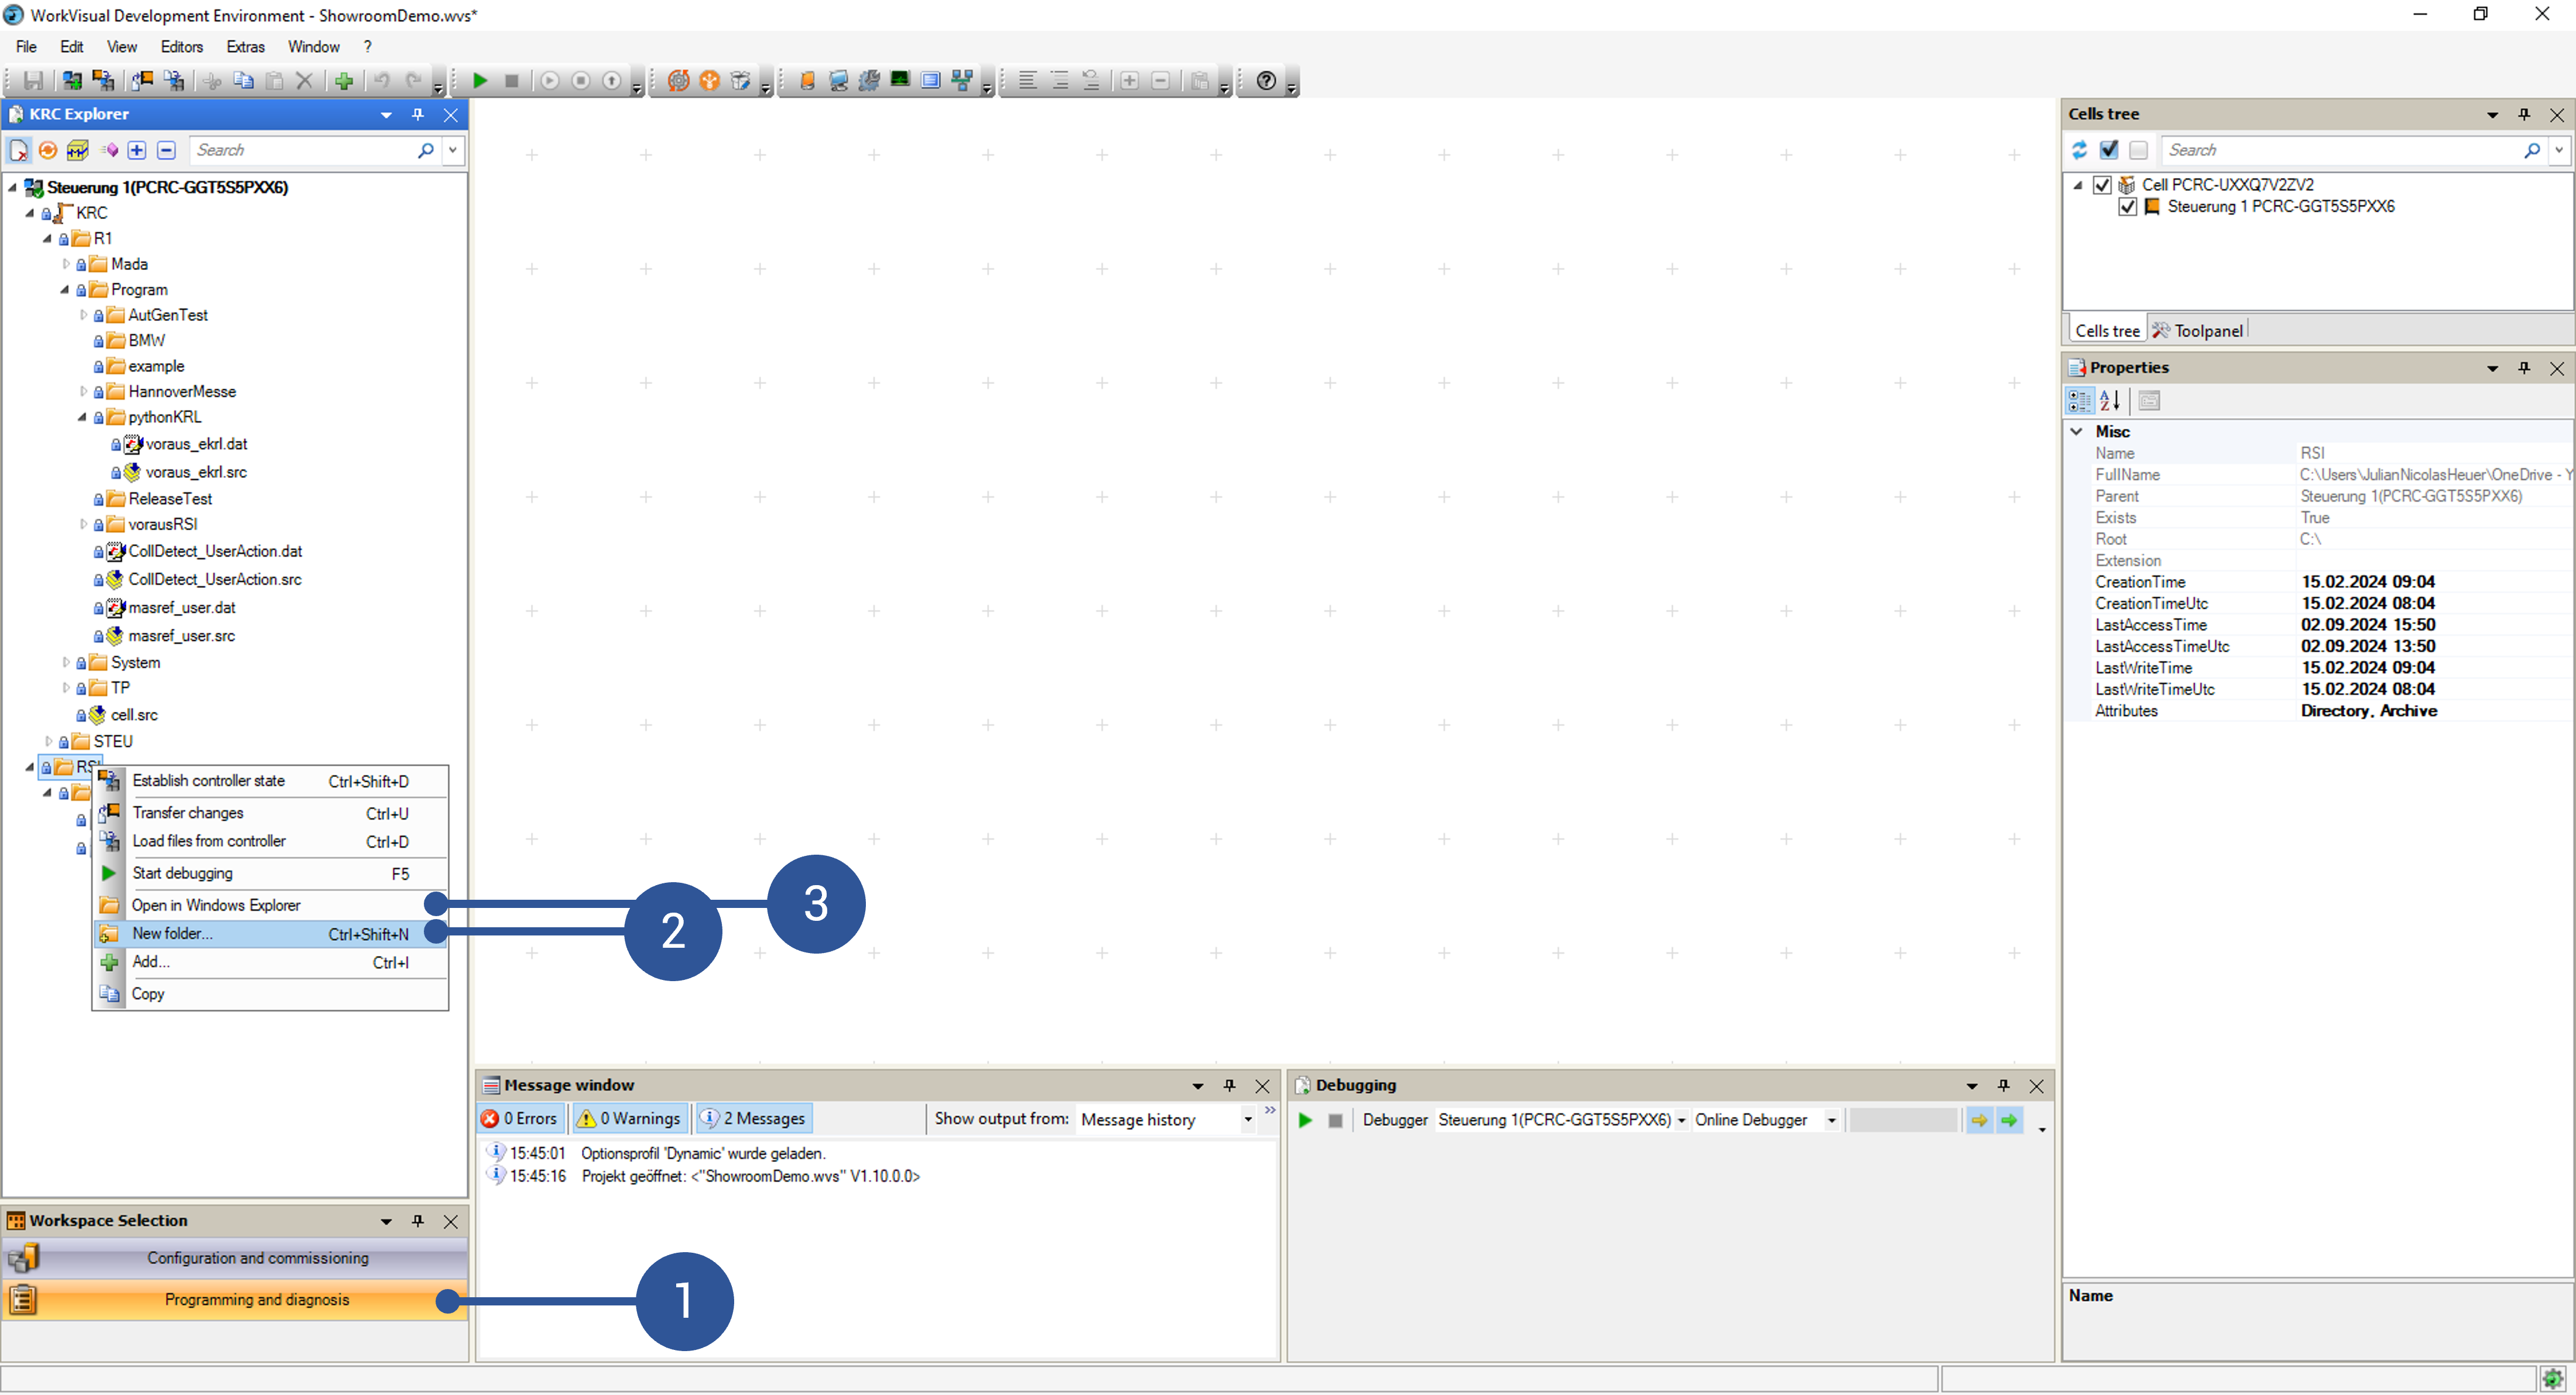
Fig. 9 Uploading files
The “vorausRSI.rsix” context file should be moved to “KRC” -> “RSI/” -> “SensorInterface/” (Fig. 10/➌).
Using WorkVisual, copy the vorausRSI.xml file to the same directory as the RSI context file. If needed, modify the IP address of the voraus.ipc:
<ROOT>
   <CONFIG>
      <IP_NUMBER>IP_of_the_voraus.ipc</IP_NUMBER>
      <PORT>59152</PORT>
      <SENTYPE>ImFree</SENTYPE>
      <ONLYSEND>FALSE</ONLYSEND>
   </CONFIG>
Add the following line into the section Userdefined Variables of System/$config.dat
INT VORAUS_TOOL_ID = 16Copy the file voraus_cell.sub to the program directory of the robot, e.g. to “KRC” -> “R1/” -> “Program/” -> “vorausRSI/” (Fig. 10/➊).
Copy the file voraus_rsi.src to the program directory of the robot, e.g. to “KRC” -> “R1/” -> “Program/” -> “vorausRSI/” (Fig. 10/➋).
Afterwards, the files have to be uploaded to the robot. You have to be logged in at least as an “expert” on the KUKA smartPAD for this. Click on Transfer changes to the controller as shown in Fig. 10/➍. Confirm the operation in the pop-up. When asked for remote access on the KUKA smartPAD, confirm it as well. When the pop-up disappears in WorkVisual, the process is complete.
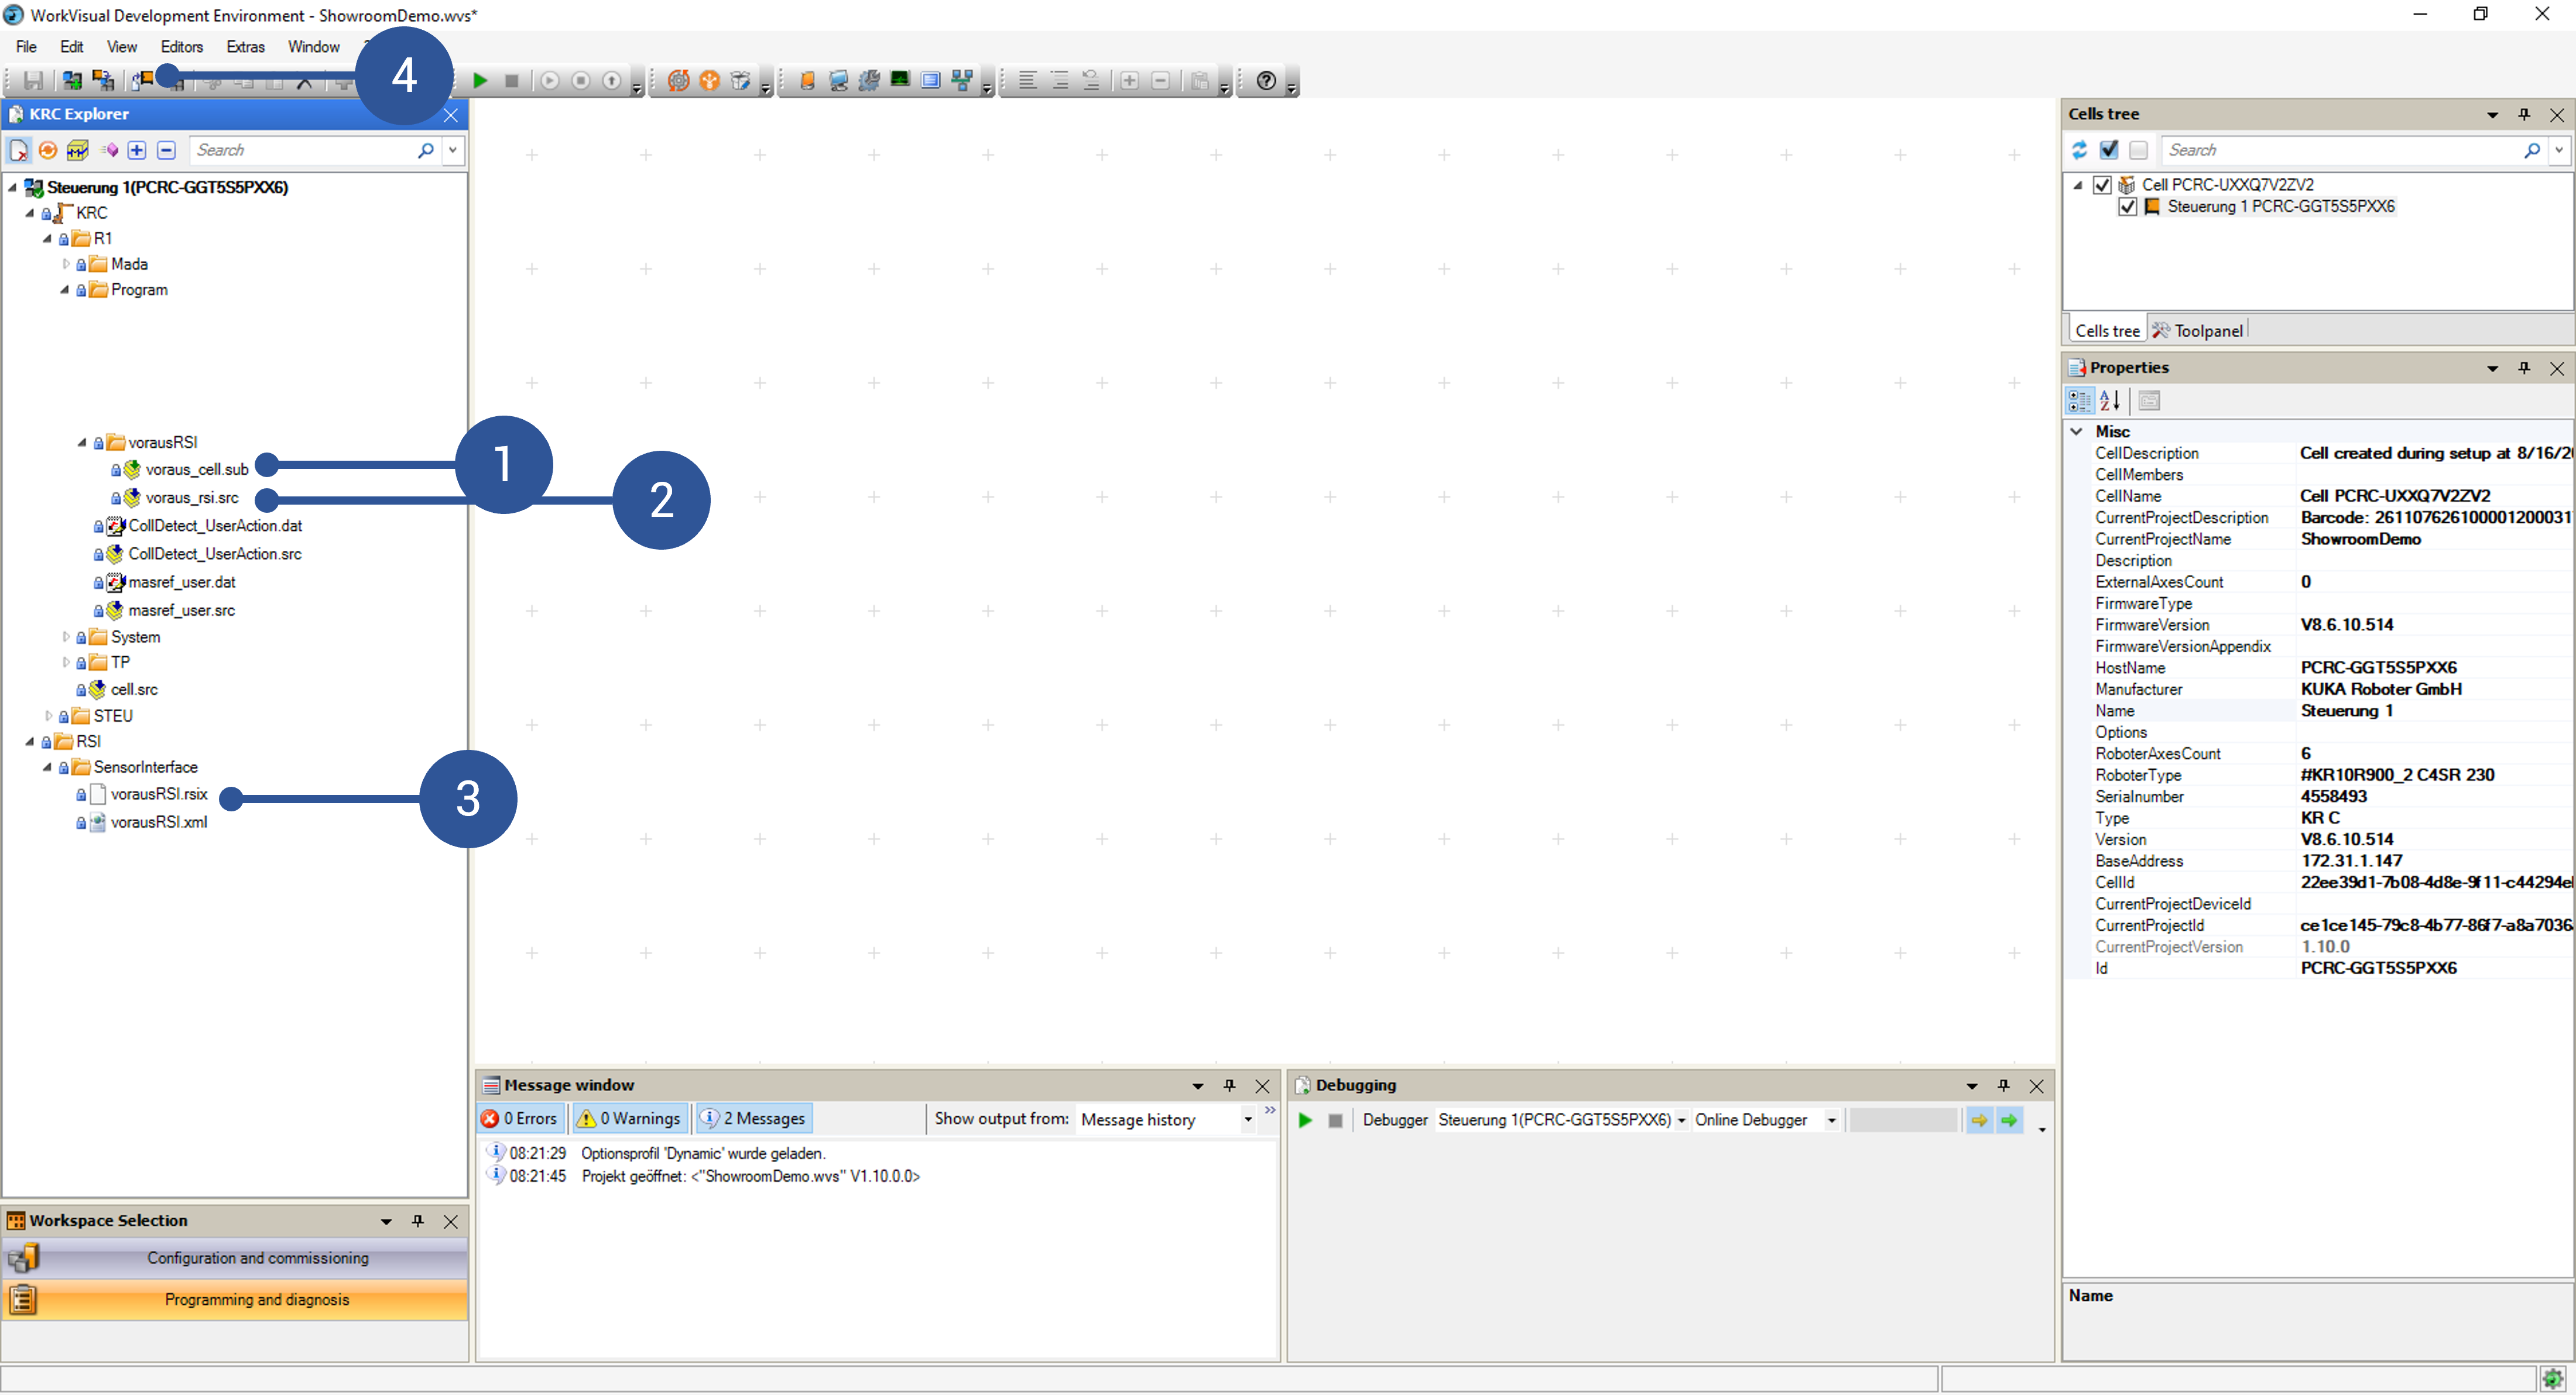
Fig. 10 File management view in WorkVisual
On the smartPAD, configure the voraus_cell.sub in the submit interpreter. This is only possible when logged in at least as an “expert”.
Enter the Submit interpreter menu on the KUKA smartPAD (Fig. 11/➊).
Click on Display/Assign (Fig. 11/➋).
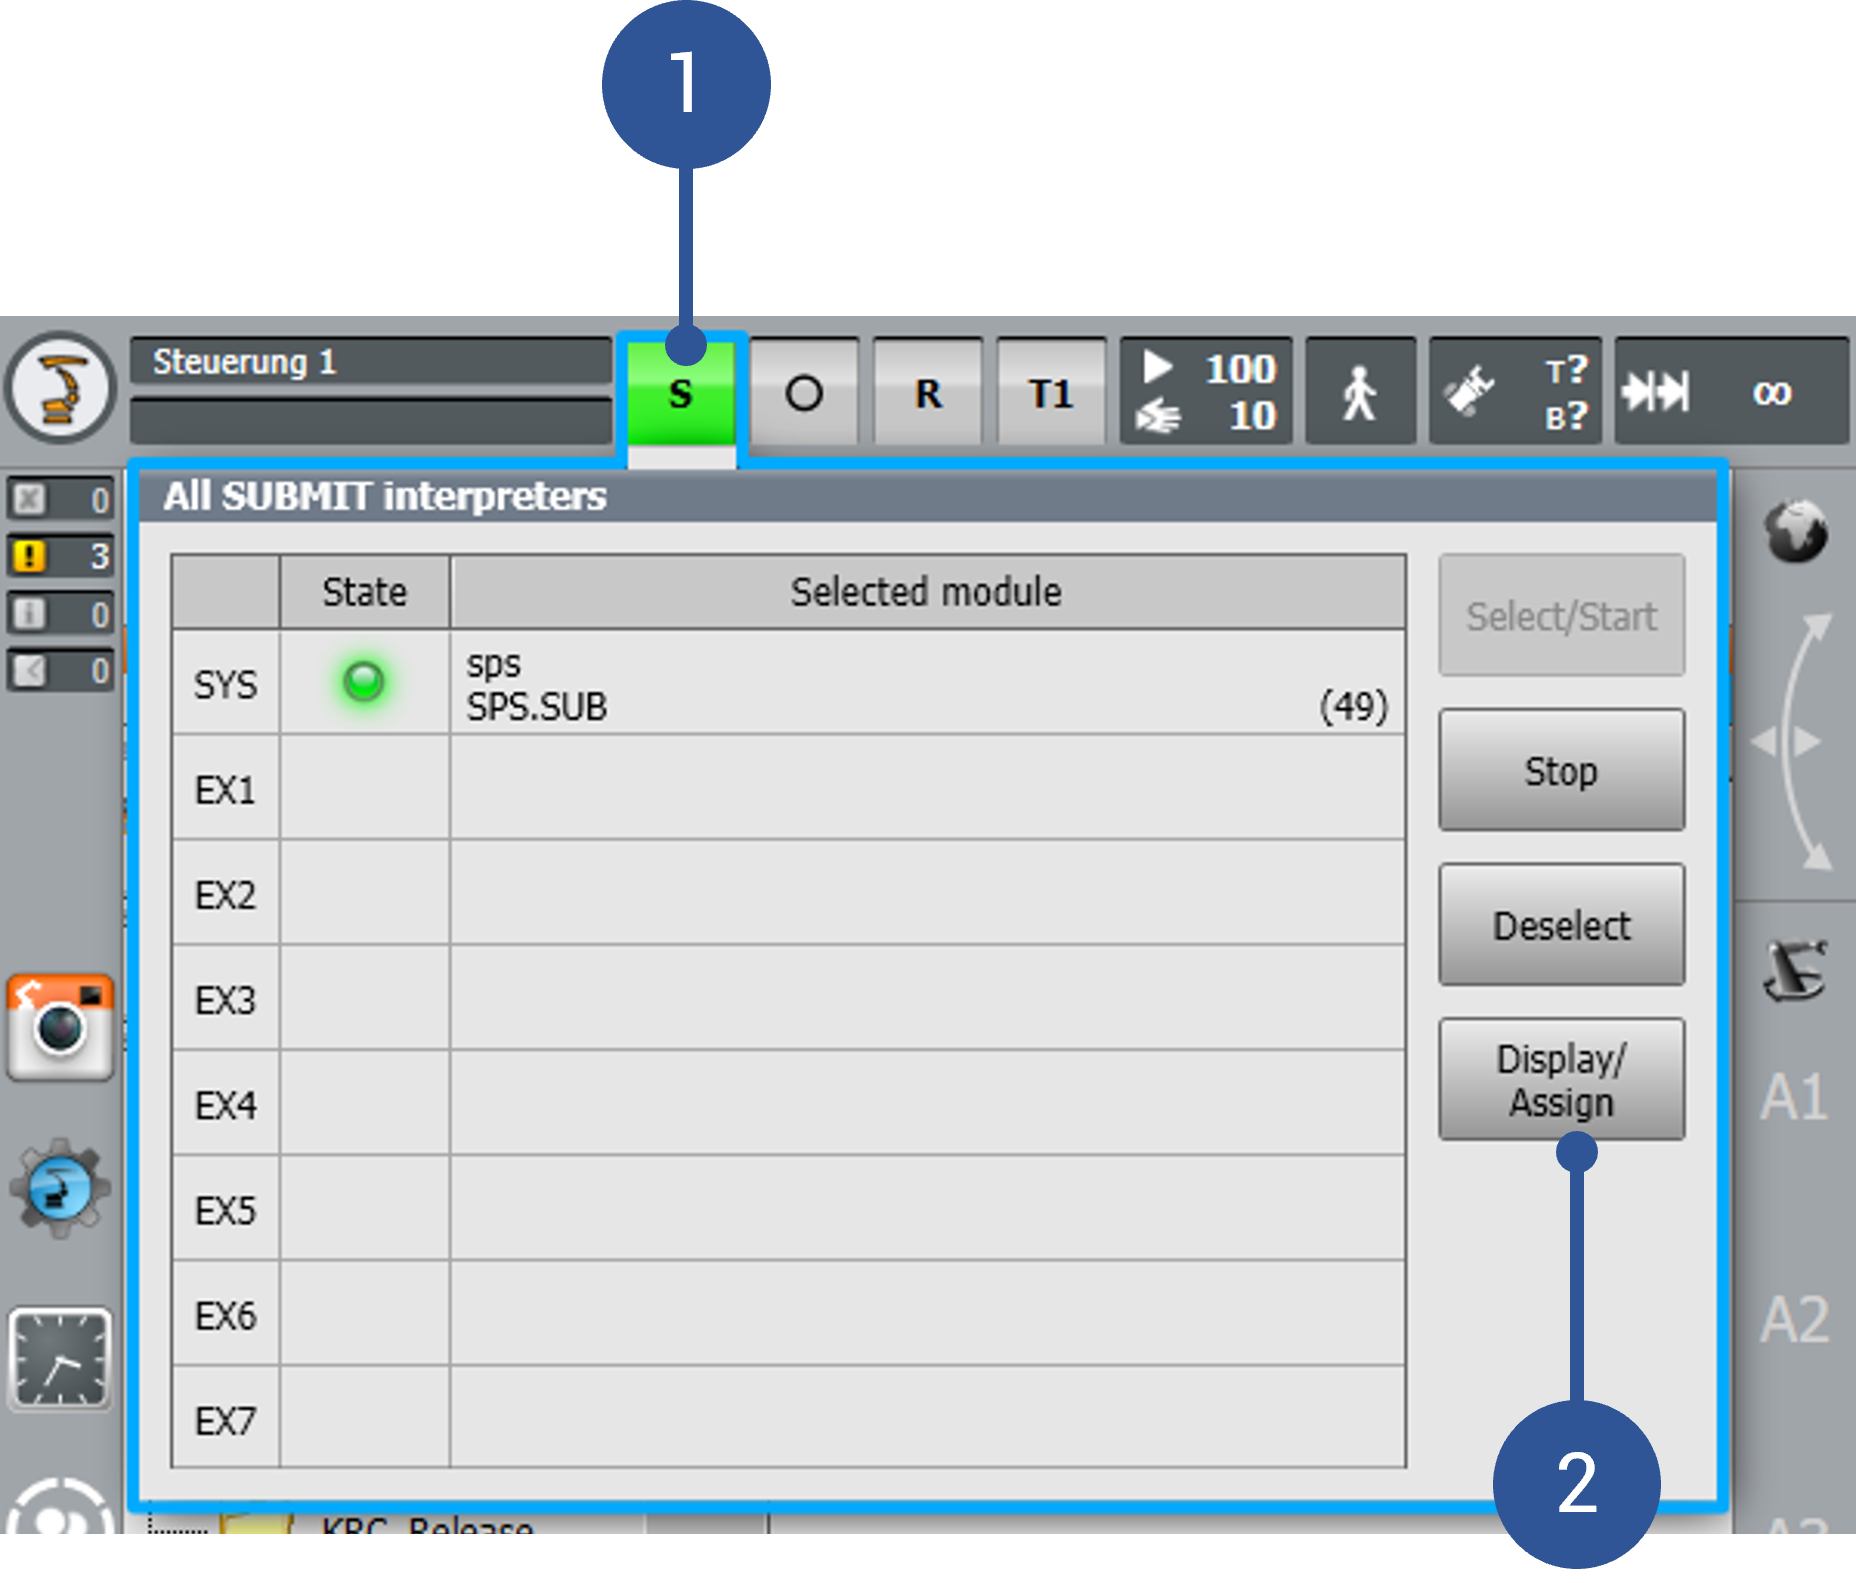
Fig. 11 KUKA submit interpreter
Enter Current Display/Assign (Fig. 12/➊)
Select the voraus_cell script in EX1 (Fig. 12/➌).
Click on Select/Start (Fig. 12/➋).
Check if voraus_cell is running (Fig. 12/➍)
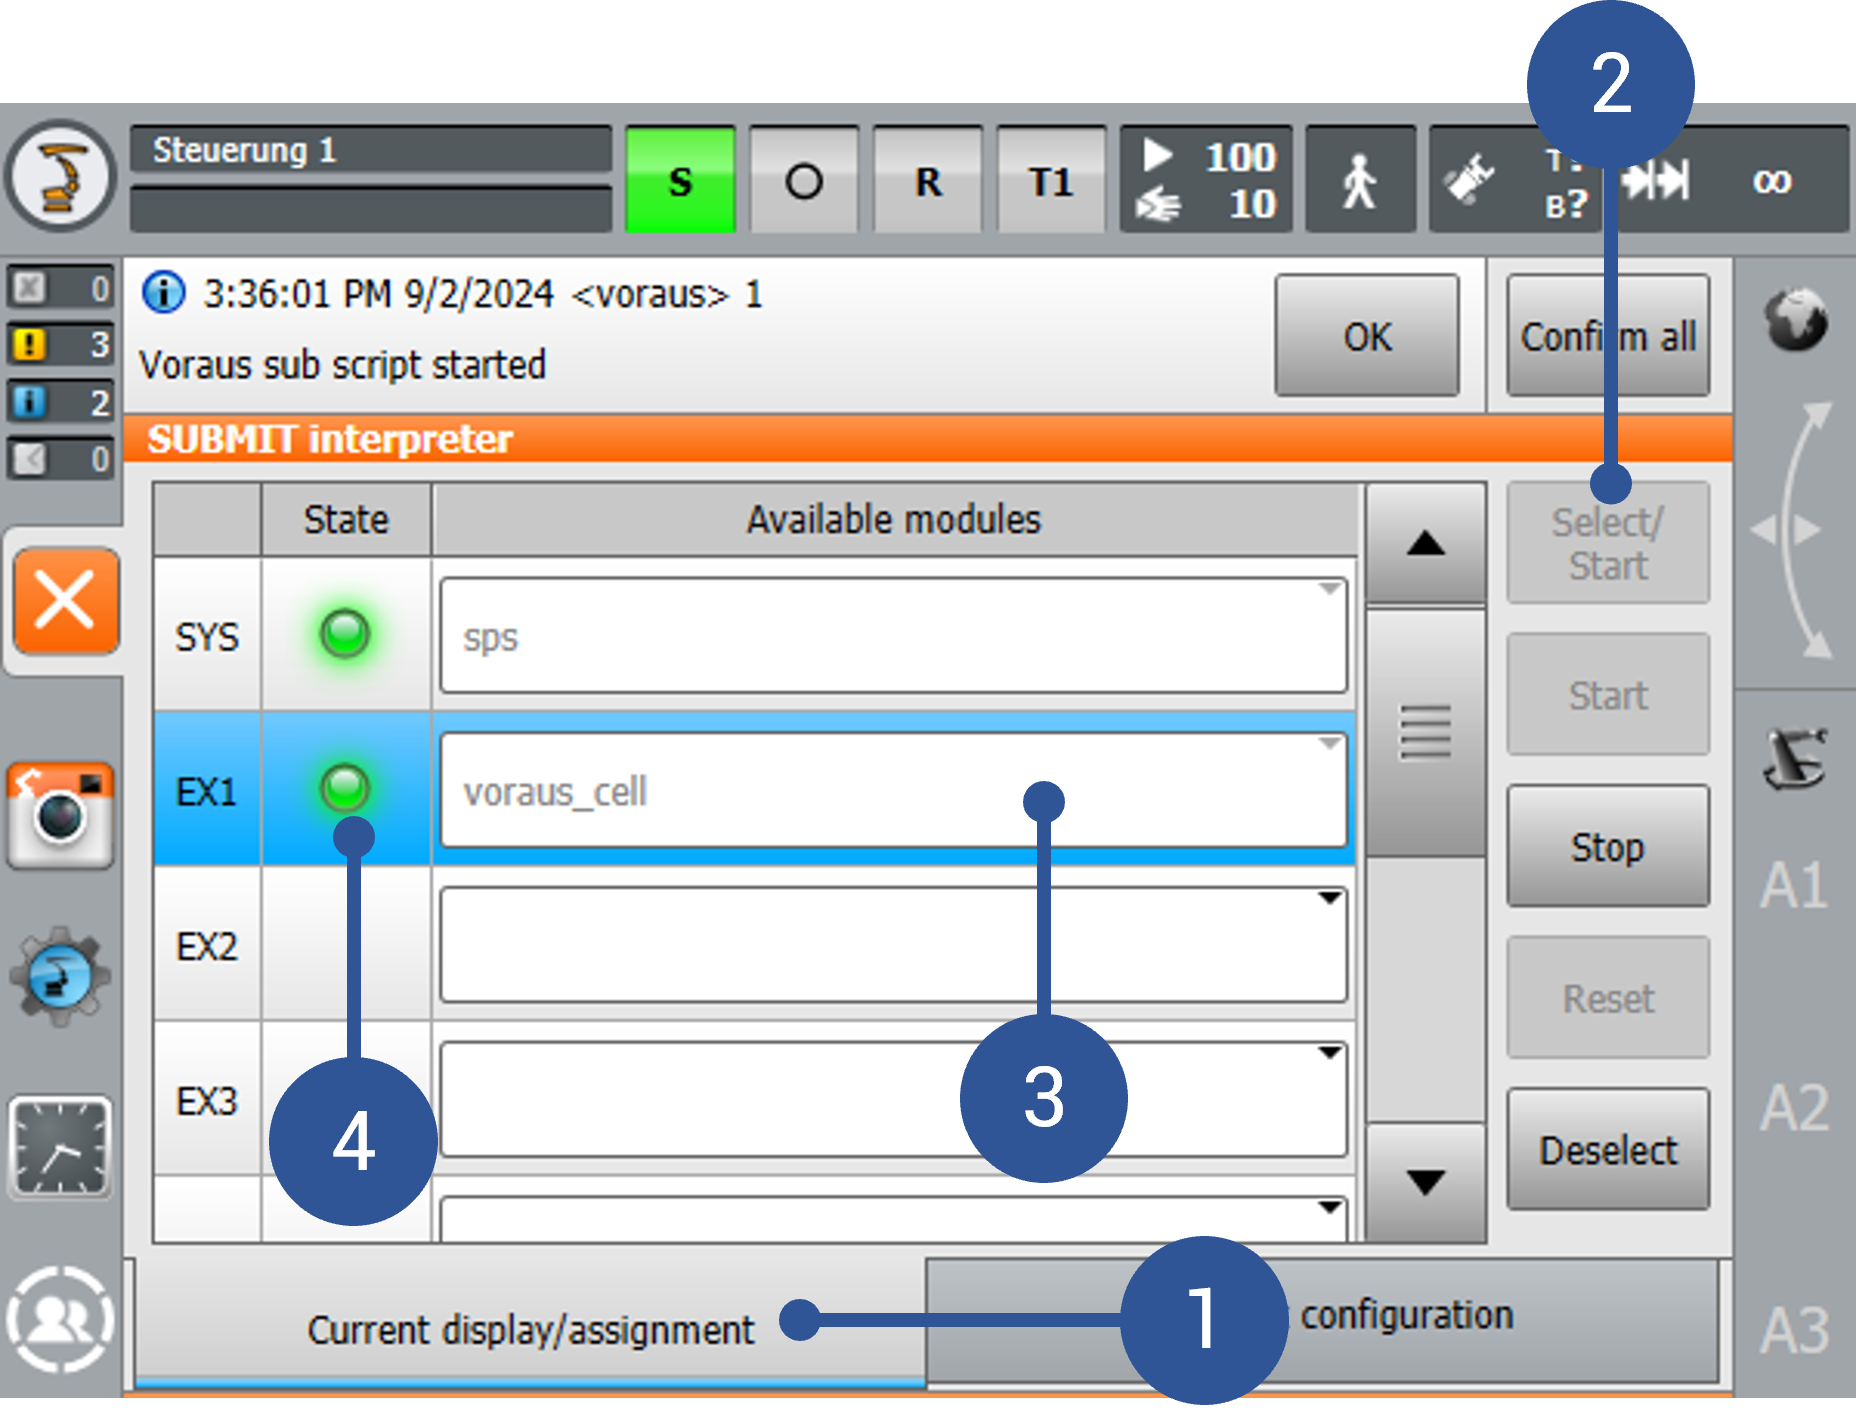
Fig. 12 KUKA submit interpreter 2
Enter the Cold start-configuration section (Fig. 13/➊) and select voraus_cell at EX1 (Fig. 13/➋).
Leave the screen (Fig. 13/➌)
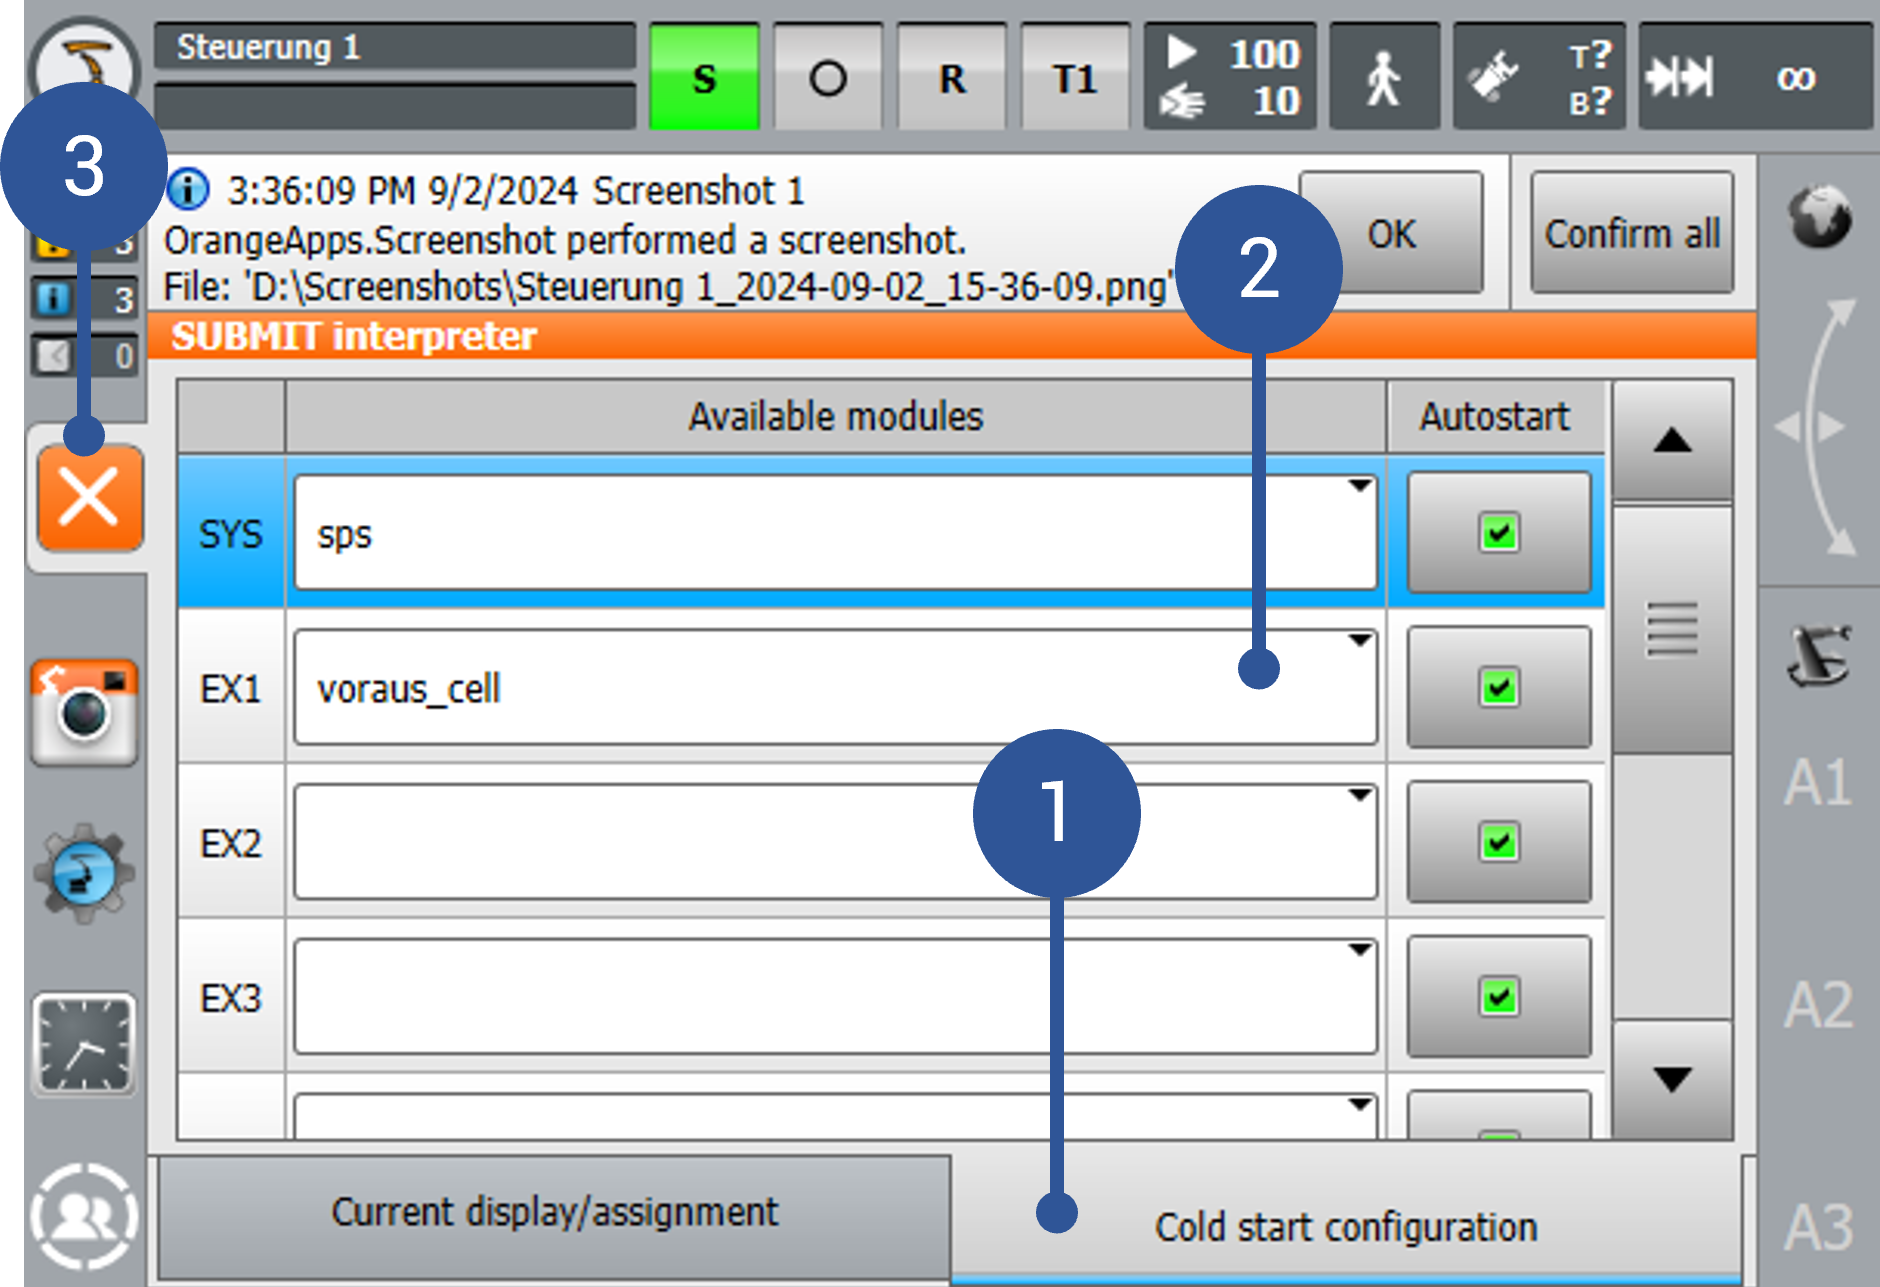
Fig. 13 KUKA submit interpreter 3
After this procedure the KUKA robot is ready to communicate with the voraus.core.
1.2. Setting up the voraus.core with a KUKA robot
The voraus.core //KUKA software requires hardware with a PREEMPT_RT kernel. As for the underlying operating system, the voraus.core software runs exclusively on x86 systems, ARM systems are not supported. For an all-in-one solution, voraus offers a pre-configured IPC, the voraus.ipc, which fulfills this requirement. Follow the instructions there to connect your voraus.ipc with your KUKA robot via Ethernet.
1.2.1. Setting up the voraus.runtime
Connect your voraus.ipc to your computer and to the robot controller via Ethernet. It is also possible to use an Ethernet switch in between the components. The voraus.core is running on the voraus.runtime. See voraus.runtime to configure and start the runtime.
1.2.2. Configure your runtime with a compose file
The compose file docker-compose_voraus.core****.yaml defines the configuration of the voraus.core. Portainer has support for compose files in the form of a Portainer Stack, which is a convenient wrapper around (Docker) compose files, allowing to work with them via a GUI. Once the compose file is uploaded to Portainer, it can be edited by opening the stack and switching to the Editor tab. Any changes must be applied by clicking the Update the stack button at the bottom of the Editor tab. For detailed information see the section voraus.runtime configuration.
In the compose file replace <codemeter-image-tag> and <core-image-tag> with the values corresponding to the version provided by voraus robotik.
 1version: "3.3"
 2
 3services:
 4  codemeter:
 5    hostname: codemeter
 6    image: artifactory.vorausrobotik.com/docker/voraus-codemeter:<codemeter-image-tag>
 7    environment:
 8      # Use the CodeMeter runtime service on the host machine.
 9      LICENSE_SERVER: "host.docker.internal"
10    extra_hosts:
11      - "host.docker.internal:host-gateway"
12    restart: unless-stopped
13
14  voraus-core:
15    image: artifactory.vorausrobotik.com/docker/voraus-core:<core-image-tag>
16
17    environment:
18      # Robot control backend
19      VORAUS__components__voraus-robot-control__enabled: True
20      VORAUS__components__voraus-robot-control-py__enabled: False
21
22      # Robot specification
23      VORAUS__robot__robotType: "KUKA_KR_10_R900_2"
24
25      # Licensing
26      CODEMETER_HOST: codemeter
27
28      # REAL ROBOT (Operator)
29      VORAUS__robot__isVirtual: False
30      VORAUS_RC_USE_REALTIME_ENVIRONMENT: True
31      VORAUS_RC_WATCHDOG: True
32      VORAUS_RC_ADJUST_IRQ_SETTINGS: False
33
34    # REAL ROBOT (Operator)
35    cap_add:
36      - IPC_LOCK
37      - SYS_NICE
38    ulimits:
39      rtprio: 50
40    devices:
41      - /dev/cpu_dma_latency
42
43    ports:
44      # Port for the voraus.operator webapp.
45      - 8080:80
46      # Port for the KUKA RSI communication (Operator)
47      - 192.168.100.142:59152:59152/udp
48
49    volumes:
50      - "voraus_data_vol:/root/data/voraus/"
51
52    restart: on-failure
53
54volumes:
55  voraus_data_vol:
56    driver: local
Most parts of the configuration are static and need no editing with the following exceptions:
Based on the desired robot to be used, the VORAUS__robot__robotType variable in line 23 can be modified:
Table 1 Robot Type Configuration Robot Model
VORAUS__robot__robotType
KUKA KR10 R1100-2
KUKA_KR_10_R1100_2
KUKA KR10 R1400-2
KUKA_KR_10_R1440_2
KUKA KR10 R900-2
KUKA_KR_10_R900_2
KUKA KR4 R600
KUKA_KR_4_R600
Note
A manual reload of the voraus.operator in the browser is necessary, if the page is already loaded. The updated configuration of the docker-compose file like the new VORAUS__robot__robotType will only be applied after a page refresh.
voraus.apps can be activated by setting a variable in the pattern:
VORAUS__components__{app_name}__enabled: TrueThe port section of the compose file (line 43 in the Compose file for a KUKA robot) defines the mapping of the voraus.core ports to the ports of the host system. A port mapping consists of the following pattern:
- {host-port}:{container_port}Any port of the container can be mapped to a free port of the host system.
By default, the port of the voraus.operator (line 45 in the Compose file for a KUKA robot) is mapped from port 80 to port 8080. If port 8080 is already blocked by another service, simply adjust the mapping.
The IP address 192.168.100.142 (line 47 in the Compose file for a KUKA robot) can be modified if needed. It will be referred to as <IP_of_the_voraus.ipc>. In any case, it must match the IP address and port used by the RSI interface and adjusted in the network configuration of the voraus.ipc.
Changing the default IP address
The port 59152 as well as the IP 192.168.100.142 (lines 47 in the Compose file for a KUKA robot) are selected for the communication with the KUKA control. If needed, this port or the IP address can be modified, e.g. when the address is already used by another device. This can be done as follows:
Open the network configuration of the voraus.ipc via SSH
sudo nano /etc/netplan/config.yamlModify the IP address of eth0
network:
  ethernets:
    eth0:
      addresses:
      - <IP_of_the_voraus.ipc>/24
[...]
Apply the changes
sudo netplan applyRestart the Portainer stack.
1.3. Start the voraus.core
Your setup is now ready to use. You can now start and stop the voraus.core using the voraus.runtime.
To open the voraus.operator:
Open a browser (preferably Chrome) in your computer and type in the following IP address: http://192.168.1.1:8080.
Start the program voraus_rsi.src on the KUKA smartPAD. It must be running while the voraus.operator is used. The program can be run either in T1 or in automatic mode.
1.4. License Activation
Activate a voraus.core software license by following the steps of the chapter License Activation.